Running workflow and viewing results
All elements and settings of the workflow are stored in the workflow folder, which is created when creating the workflow. In order to execute the workflow, the content of the workflow folder is copied into a separate directory called the run directory. Each time the workflow is executed, a new run directory is created. The workflow results obtained during a given run are saved in the run directory that was created for that run.
To execute the workflow, a run directory must be set up, and then the
workflow must be run from that directory. You can also run the workflow
directly from the workflow designer, having a new run directory set up
automatically and run parameters set as specified in the Run setup
pane in the workflow designer. To run the workflow in this way, click
the ![]() button on the toolbar when
in the workflow designer.
button on the toolbar when
in the workflow designer.
You can also set up a run directory for further configuration without
executing the workflow immediately. To do this, click the
![]() button on the toolbar in the
workflow designer. The directory created in this way opens in the run
editor, where you can upload files to your run and change the run parameters.
To start the execution of the workflow in this case, click the
button on the toolbar in the
workflow designer. The directory created in this way opens in the run
editor, where you can upload files to your run and change the run parameters.
To start the execution of the workflow in this case, click the
![]() button on the run editor's toolbar.
button on the run editor's toolbar.
The results of the completed workflow run are saved in the run directory. To view the results, you can use:
- The Results area in the run editor - view the data at the inputs and outputs, which were included in the workflow results by their settings. For details, see Viewing the results in the run editor.
- The contents of working directories displayed in the Explorer pane - depending upon how the workflow is designed, files with initial data and computation results can be saved in the working directories of its blocks. For details, see Viewing files in working directories.
- Reports - view and analyze the results stored in the computation
history files
.p7table. For details, see Analyzing computation history files.
Viewing the results in the run editor
You can open the completed run of the workflow to view its results in the run editor from the Runs list on the Start page. The run name in this list is composed of the run number followed by the name of the workflow in parentheses. Double-click the run name to open the run for viewing in the editor.
The Results area in the Run setup pane displays the values of all
input and output ports that were saved in the results of this workflow
run. Input ports are indicated by the
![]() icon; output ports are
indicated by the
icon; output ports are
indicated by the ![]() icon:
icon:
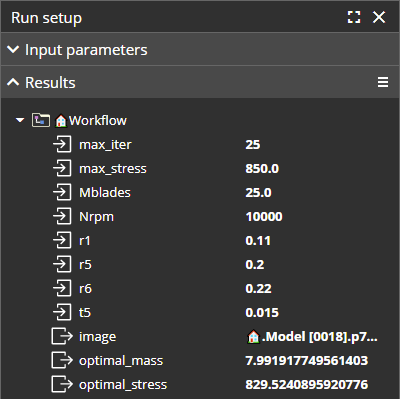
You can preview the port value next to the port name in the Results list. Clicking that preview opens the View value dialog, which displays the full value.
Viewing files in working directories
Working directories are created by copying their prototypes during the run. Upon completion of the run, the working directories, along with all their contents, are saved in the run directory. To view working directories, use the Explorer pane as follows:
-
In the Explorer pane, navigate to your workflow directory, and then select the Runs tab located under the pane heading.
The Runs tab lists folders, each of which represents a certain run directory of this workflow. The folder name is the run sequence number.
-
From the folder list on the Runs tab, navigate to the folder with the desired run number.
What if the workflow is read-only
If the workflow is read-only, the run directory is created in the home directory of the current user. The user specifies the name and location of the run directory when setting up the run. For details, see Running a read-only workflow.
The content of the run directory depends upon the working directory settings selected for the Composite blocks included in the workflow. Below is an example of a run directory for a workflow with the following settings:
- The default name for the workflow root -
🏠. - Separate working directory for each iteration of the
Modelcomposite block located in the workflow root (working directory setting -indexed, working directory prototype folder name -🏠.Model [####]). - The
Modelblock serves as the body of a certain loop with the loop driver block calledOptimizer.
After completing a run for such a workflow, the contents of the run directory would be similar to the following:
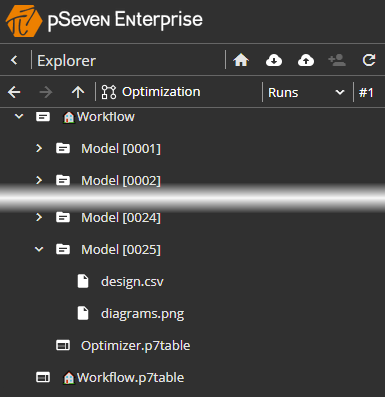
In this example, the workflow run directory contains 25 working
directories of the Model block. This means that 25 iterations were
performed during the run. Each working directory of the Model block
contains two files, design.csv and diagrams.png, generated by that
block at the respective iteration.
The computation history file 🏠.p7table stores the results that you
can view in the run editor. This file is
located in the run directory root as it applies to the entire workflow.
The Optimizer.p7table file in this example stores the computation
results at each iteration of the loop driven by the Optimizer block.
It is convenient to view and analyze the contents of .p7table files
by using the report builder (see
Analyzing computation history files).
Analyzing computation history files
pSeven Enterprise provides easy-to-use and efficient reports for viewing and analyzing workflow results. Each report has its own database and data visualization tools. The data stored in the report can be presented in a tabular form with a wide variety of filtering and data selection options, as well as in the form of flexibly customizable graphs and charts.
To create a report, open the Start page and click New report at top of the page. The new empty report opens in a separate tab. Then, you need to populate the report database, and add and configure data viewers.
As an example, consider using a report to analyze the
Optimizer.p7table file discussed in
Viewing files in working directories. To
populate the report database with the contents of this file, drag the
file from the Explorer pane to the surface of the report tab. You can
review the current report data in the database viewer. Click the top
button in the top-left corner of the report tab to open the database
viewer pane.
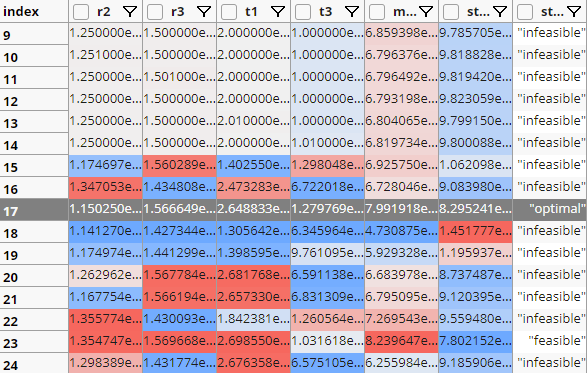
Use the second button from the top in the top-left corner of the report tab to add a tool for viewing data in tabular form - Sample viewer. Press F4 to configure this viewer. After completing the configuration, the table with your data might look something like this:
Running a read-only workflow
If the current user has full access to the workflow, the run directory is created in the workflow directory. However, user access to the workflow directory can be restricted. This occurs when the workflow is shared with the user for read-only.
A user with read-only access to the workflow can configure and start a workflow run, but the run directory in this case is created in the user's home directory. When setting up a new run, the user is prompted to specify the name of the run and select a folder in their home directory. The run directory with the specified name will be created in the that folder.
When the run is completed, all results are saved in the user-specified run directory. The content of the run directory remains the same as in the case of full access to the workflow. In particular, the structure of working directories is exactly the same as described in Viewing files in working directories.