User blocks guide
In pSeven Enterprise, you can extend the block library with your own blocks. To do this, you need to develop a block prototype and load it into the block library. Then you can add a block from the library to the workflow.
Block prototype example
The Common library section of the block library provides an example of a custom block that you can use as a basis for developing your own block. To get started on your block, download the example block from the library:
- Create a new workflow or open an existing one to access the block library.
- In the Common library section of the block library, drag
 Example user block
from the Special subsection onto the Explorer pane.
Example user block
from the Special subsection onto the Explorer pane. - In the Explorer pane, use the Download files command to download
the
 Example user block folder to a
local folder on your computer.
Example user block folder to a
local folder on your computer.
Important
To drag a block from the library onto the Explorer pane, you must
have the app_auth | user | Can develop blocks permission; otherwise,
a message appears stating that you do not have permission to copy blocks
from the block library. By default, every pSeven Enterprise user
has this permission, but the administrator can remove it for
individual users. Such users will not be able to develop blocks.
As a result of these steps, the local folder on your computer contains
the Example user block.zip archive. Unzip it to extract the
Example user block.p7protoblock folder. This folder contains sample
code from which you can start developing your own block.
Important
The name of the folder containing the block code must have the
.p7protoblock extension; otherwise, the block library will not
recognize it as a block prototype.
Block implementation overview
Review the block example code you downloaded for implementation details. Pay attention to the comments in the code files. The block implements an HTTP server with two run modes:
- The edit mode is used to work with the block during workflow setup.
- The run mode is used when the block is executed during a workflow run.
In edit mode, the block server must handle the following requests:
- Open block - GET request to load the block UI.
- UI commands - POST requests issued by the UI when configuring the block.
In run mode, the block server must handle POST requests passing commands from the workflow runtime.
The main elements of a custom block implementation are:
- Manifest - a YAML file that identifies the block, specifies its
execution environment, startup commands, and other block properties.
This file must be named
manifest.yamland be located in the root of the.p7protoblockfolder containing the block code. - Frontend - web UI for configuring the block. Frontend requests are passed to the block server.
- Backend - the HTTP server that handles requests both from the frontend (in edit mode) and from the workflow runtime (in run mode).
For implementation details, see the code comments in the custom block
example, starting with the comments in the manifest.yaml file.
Developing a custom block
To create a new custom block, start with the code provided in the
Example user block.p7protoblock folder, and follow the comments in the
sample code files.
When starting to develop a new block, you should change the block ID -
the id parameter in the manifest.yaml file. Otherwise, your block
might conflict with other blocks in the library. A block ID is a UUID in
the hexadecimal string form, a 32-character hexadecimal string without
dashes. The ID for the new block in the required format you can obtain,
for example, using Python:
import uuid
print(uuid.uuid4().hex)
When developing a new version of a block, do not change the block ID. To
distinguish between different versions of a block, use the version
parameter in the manifest.yaml file (see
Block version numbering).
There is no required folder structure for your code. Having loaded the
block, its manifest is used to locate UI files, startup scripts, and so
on, so you are free to choose the folders for your code files, provided
you have made the necessary changes to the manifest. However, it is more
advisable to stick to the folder structure in accordance with the
default manifest settings, placing the appropriate parts of the code in
the userblock, scripts and static folders.
The top-level folder name extension must be .p7protoblock, such as
folder-name.p7protoblock. You can set the folder name at your
discretion. Consider following a consistent folder naming scheme that
specifies the name, ID, and version of your block. This will help you
keep track of your custom blocks and their code versions, and will also
avoid possible name conflicts when updating your block in the pSeven
Enterprise block library. Recommended folder name format is
<block-name>-<ID>-<version-number>.p7protoblock.
Block version numbering
The pSeven Enterprise block library allows you to load different versions of a
custom block with the same ID. To distinguish between block versions, the
version parameter in the manifest.yaml file is used.
- When starting to develop a new block (with a new block ID), set
versionto1. - When starting to develop a new version of an existing block (keeping the
block ID), increment the value of the
versionparameter. - When testing and debugging a block during development, do not change its version number.
Tagging the block under development
When developing a new version of a custom block, it is highly advisable
to give it the DEV tag, indicating that the block is under development.
This tag is added through the tags parameter in the manifest.yaml file:
tags: [{"": "DEV"}]
The example user block that ships with pSeven Enterprise (see Block prototype example) has the DEV tag added by default.
The main purpose of the DEV tag:
- Mark the block in the Block library pane. The DEV tag shows up next to the name of the block, indicating that this block is under development and should not be published to users.
- Disable the code cache for blocks intended to run on Windows extension nodes. When pSeven Enterprise first runs a block on an extension node, it saves a copy of the block code in the node's local cache to avoid copying it to the node every time that block runs. Your modified block of the same version without the DEV tag would conflict with its earlier state stored in the cache. Disabling the cache allows the modified block to run with the same version number.
Disabling the cache may cause significant time delays when configuring the block or running it within a workflow. When you are done testing and debugging the new version of the block, remove the DEV tag before you proceed to publish the updated block. For example, if you publish the block without any custom tags, the list of tags in the block's manifest should be empty:
tags: []
If you publish the block with custom tags, the list should include only your tags, without the DEV tag.
Adding Python modules
If your block uses any Python modules not provided by pSeven Enterprise, these modules need to be added to the block prototype. The module distribution and all its dependencies must contain only Python code. Such distributions are commonly referred to as pure Python module distributions.
To add modules from a distribution to your block prototype, use the
following command: pip install --target <directory> <distribution>
where <directory> is the path to your block prototype folder
(.p7protoblock), and <distribution> is the name of the distribution.
Example:
pip install --target CustomBlock.p7protoblock extra_lib
This example adds the modules from the extra_lib distribution to the
block prototype held in the CustomBlock.p7protoblock folder that is
located in the current working directory.
Installing a module also installs all its dependencies to the block prototype. Once you have installed a module, you can import it in your block code as usual:
import extra_lib
File dialog
If configuring your block requires the user to select a file - for example, a template or model, which the block loads in edit mode - use the pSeven Enterprise stock file dialog.
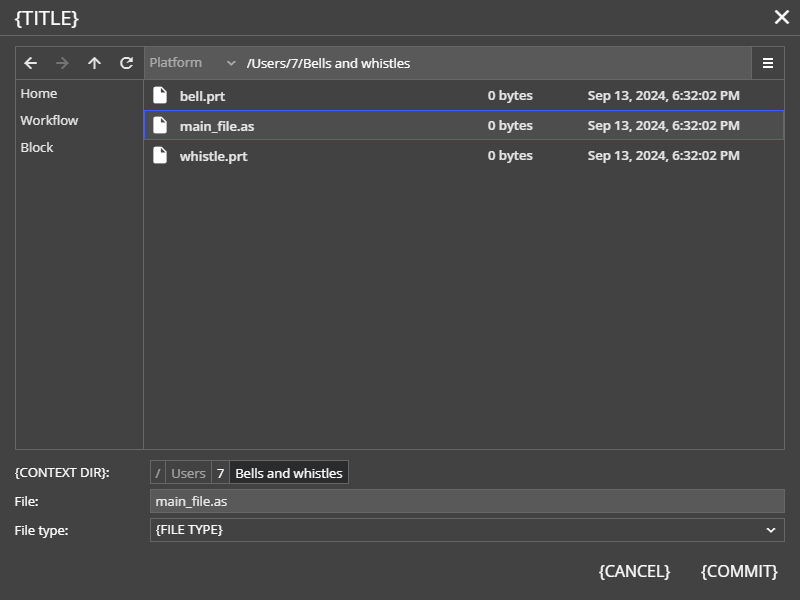
The dialog supports the usage scenario where the user selects a file and additionally specifies a folder with its dependencies - for example, the main file of some assembly and the folder containing the parts. Further it is called context folder (see {CONTEXT DIR} in the figure).
-
In your block UI implementation, add
@api.js- seeExample user block:index.html<!DOCTYPE html> <html lang="en"> ... <body> ... <!-- Block's interactive UI. --> <script src="index.js"></script> <!-- pSeven Enterprise Javascript API. --> <script src="@api.js"></script> </body> </html>@api.jsadds the following functions to the global scope:xSeven.filedialog.selectFile(config)- select a single file.xSeven.filedialog.selectFiles(config)- select multiple files.xSeven.filedialog.selectFolder(config)- select a folder.
Use the
configparameter to set up the dialog.config{ // Your dialog title - see {TITLE} in the figure at the beginning of this section. "title": "Select a model or assembly", // The commit button label - see {COMMIT}. "okLabel": "Select", // The cancel button label - see {CANCEL}. "cancelLabel": "Cancel", // Specific name of the context folder for the current dialog. // If specified, the context folder selector will appear in the dialog - see {CONTEXT DIR}. // Only selectFile() supports this. "context": "Assembly folder", // If you do not need a context folder, omit this property or set null. // Also omit it for selectFiles() and selectFolder() - those methods // do not support context folder. // "context": null, // Files of what type the user can select in the current dialog. // A list of [{"typename": ["name mask 1", "name mask 2"]}, ...]. // See {FILE TYPE} in the figure above. "filters": [ {"Model, assembly": ["*.prt", "*.as"]}, {"All files": ["*"]} ] } -
Call one of the file selection functions - the block will display a file dialog to its user. The function returns a Promise, and when the user confirms the file selection in the dialog, that Promise resolves with an object or array of objects that you use to access the files.
// selectFile() without a context folder ("context": null), as well as
// selectFolder(), return one object containing the name of the selected file (folder).
// selectFiles() also returns one object, if the user has selected a single file.
{
  "filename": "main_file.as",
  ".payload": "eyJuYW1lIjoiZGQtbmluYWx1YS1jdXN0b21lbWJsZW1zLmdpZiIsInBhdGgiOiIv"
}

// If the user has selected multiple files, selectFiles() returns an array.
[
  {
    "filename": "bell.prt",
    ".payload": "eyJuYW1lIjoic2VwdWxpcmYW5poIjoiL1VzZXJzLzcvZm9vIiwidYwNjkyMzgzNzN9"
  },
  {
    "filename": "whistle.prt",
    ".payload": "VXNlcnMvNy9mb28iLCJ0eXBlIjoiRklMRSIsImlhdCI6MTcyNjA2OTIzODM3Mn0="
  }
]

// selectFile() with a context folder returns an object containing the name
// of the context folder, and the path to file relative to that folder.

// selectFile() with a context folder returns an object with the folder name
// ("context"), and "filename" is the path to the file relative to that
// folder (so if the file is in the folder root - simply the filename).
{
  "filename": "main_file.as",
  "context": "Bells and whistles",
  ".payload": "sInBhdGgiOiIvVXNlcnMvNyIsInR5cGUiOiJGSUxFIiWF0IjoxNzI2MDY5MjY1OTQ1fQ=="
}
Do not save or modify the above objects
As shown in the examples above, the object you get has the
".payload"property, which can be understood as an access token or a transient identifier. The block must pass that token to pSeven Enterprise to gain access to the file. The token is only valid in the current editing session, that is, only until the user closes the block window. Even if you somehow save the token, in another edit session you will not be able to use the saved token to access the file.You can use the strings from
"filename"and"context"in the block UI - to display the names of selected files and folders to the user. The UI must not otherwise parse or modify the object (or array) you have got: pass them from the UI to the block's backend, unmodified. -
Send the object or array returned by file selection functions in a POST request to an endpoint at the backend that you implement to handle file selection requests. In
Example user block
such an endpoint is called select-file, and the request is (simplified example):const selectedFile = await xSeven.filedialog.selectFile(config); fetch(`{block API URL}/select-file`, { method: "POST", headers: {'Content-Type': 'application/json'}, body: JSON.stringify(selectedFile), });pSeven Enterprise does not require using exactly that endpoint name (
select-file) - you can give it any name that is valid. -
Having received the above request from the UI, the block backend must call the
get-filemethod of the pSeven Enterprise API and pass it the object received from the UI. The response from pSeven Enterprise will contain an object with the"file_path"and"context_path"properties - the paths you can now use to open the file. SeeExample user block:server.py# A snippet from RequestHandler.do_POST(). # ... elif self.path == "/-/api/select-file": # call_pseven() - a wrapper method to send API requests, implemented in the example. # body - the body of the request from UI received at the backend. r = self.server.call_pseven("get-file", body.get("data")) # Absolute path to the file. file_path = r.get("file_path") # Absolute path to the context folder - if it was enabled in the dialog. context_path = r.get("context_path") # read_and_parse() - the method you implement to process the file; # it should prepare the response that the block will send to its UI. with open(file_path, 'r') as f: response = self.read_and_parse(f)Do not save the received objects or paths
Objects received from the block UI and from pSeven Enterprise, as well as
file_pathandcontext_path, are only valid for the current editing session. In another session you will not be able to access the file using an object or path saved earlier.If your UI needs any data from a file selected by the user, then it must receive that data from the block's backend - as in the example above. The backend must not return the object received from pSeven Enterprise, and must not pass any paths to the UI - only the data it reads from the file.
Block assets
If your block needs to read data from a file, which should not be placed into the block prototype, you can add that file to block assets in the shared data storage. Typical examples of such files are:
- A database or other file with reference data that updates more often than you update the block.
- A simulation model, which the block runs.
- A static file that does not change even if you update the block, or rarely changes.
Using block assets to store large files (models, databases) can save much disk space, but you will have to keep in mind that pSeven Enterprise does not handle any dependencies between your block and assets it may use.
When a user first adds your block to a workflow, that block is copied to the workflow library. This creates an independent copy of the protoblock folder in the workflow. All block instances in the workflow work with that copy of the protoblock folder and do not synchronize it with the protoblock in the shared data storage. Synchronization happens only if the user accepts a block update in workflow library. Keeping a copy of the protoblock in the workflow helps pSeven Enterprise to avoid many issues related to block version upgrades.
Block assets are not handled by pSeven Enterprise in a similar way. Assets are never copied automatically, and you have to track dependencies between block versions and assets yourself. If your block depends on a file from assets, all block instances in all user workflows read that same file. Moreover, in a given pSeven Enterprise deployment all block assets are common to all user blocks in that deployment - so other block developers may be using the same asset your block uses.
Before you start using block assets, consider the following:
- Assets are read-only - your block cannot write to a file in assets, because at the same time that file may be in use by another block. In general, no block has write access to asset files.
- Block developers and administrators of a pSeven Enterprise deployment, where block assets are used in development, have to be extra careful when publishing, updating and otherwise maintaining blocks because all dependencies between blocks and assets have to be tracked manually. Note that dependency problems are easily avoided by adding all required files to the block prototype, which makes the block self-contained.
- If different versions of your block need different versions of an asset file, you will have to keep each version of that file in assets. Removing an outdated version of an asset file is risky even if you have already removed the block version that had used it.
- When you remove, rename, or otherwise modify a file in assets, you risk creating issues in user workflows. As noted above, workflows store independent and non-synchronized copies of your protoblock, and some users may decide to keep an outdated version of your block in their workflows. Those workflows will likely run into an error if you remove an asset file required by the user's version of the block. Note that even if you completely unpublish an old version of a block, user workflows can still keep a copy of that version in the workflow library and continue using it. There is no way to force a block update or removal in user workflows.
An asset is a folder, which may contain many asset files or subfolders with files. To make those files available to user blocks, the asset has to be published by uploading the asset folder to the pSeven Enterprise shared data storage. Publishing an asset requires full access to the shared data storage, so it is done by a deployment administrator (see Publishing and updating assets). After an asset has been published, any user block can declare that it requires files from that asset (see Reading files from assets). Note that there are no restrictions for using the same asset in various blocks (with different prototypes).
Publishing and updating assets
Block assets can be published and updated only by a pSeven Enterprise
deployment administrator who has full access to the shared data storage. To
publish an asset, the administrator needs to copy the asset folder to the
assets folder in the shared data storage and set permissions so pSeven
Enterprise has read and write access but user blocks have read-only access to
files in the copied folder. The steps to update a previously published asset
are the same - new versions of asset files are simply copied over existing
ones - but keep in mind that pSeven Enterprise does not track dependencies
between user blocks and assets. Before you update an asset, verify that the
update does not create issues in any of the blocks requiring files from that
asset.
How to locate the shared data storage
The shared data storage location is specified by the
storage.shareddata.* parameters in the deployment configuration
file values.yaml (see the
pSeven Enterprise deployment
guide).
Follow the steps below to publish or update a block asset:
- Connect to the shared data storage server as a user with root permissions.
-
Upload the asset: copy the asset folder (for example,
common_data) to the<shareddata>/assetsfolder on the server, where<shareddata>stands for the location of the shared data storage. In this example, the path to the uploaded asset folder would be<shareddata>/assets/common_data.The name of the asset folder should contain only lowercase English letters, digits, and underscores (the
[a-z0-9_]character set); other characters are forbidden in asset names. pSeven Enterprise does not check the folder name when you publish an asset, but forbidden characters in the name will cause an error in any user block that declares a dependency on that asset.You can use symlinks if you want to avoid renaming assets
If the asset folder name contains forbidden characters but you want to avoid changing it, you can create a symbolic link to the uploaded asset folder, giving the link a proper name. For example, the folder may be named
Common-Data, which is an invalid name for an asset (uppercase letters and-are forbidden). Instead of renaming the folder, you can upload it as is and then create a symbolic link namedcommon_data:# ln -s <shareddata>/assets/Common-Data <shareddata>/assets/common_dataAfter this, user blocks can specify the asset name
common_datato access files in the<shareddata>/assets/Common-Datafolder. -
pSeven Enterprise connects to the storage as a system user with UID 11111. That system user must be the owner of asset files and have read-write permissions in assets. A block connects to the storage as the user who configures or runs that block, so all users except system must have read-only access. For example, if you are publishing an asset named
common_data, you can set the required permissions as follows:-
Set the pSeven Enterprise system user as the owner:
# chown -R 11111:11111 <shareddata>/assets/common_data/ -
All asset subdirectories must have
drwxr-xr-xpermissions:# find <shareddata>/assets/common_data/ -type d -exec chmod 755 {} \; -
Asset files must be read-only to everyone except the owner and must keep the executable flag (
x):# find <shareddata>/assets/common_data/ -type f -exec chmod "u+rw,go+r,go-w" {} \;
-
Reading files from assets
After an asset has been published to pSeven Enterprise, your block can read
asset files. To get access to files, the block must declare its asset
requirements, which are specified by the following parameters in the block's
manifest (manifest.yaml):
edit.assets- a list containing names of assets your block requires in the edit mode.run.assets- a list containing names of assets your block requires in the run mode.
For example:
edit:
    assets: [common_data, reference_docs]

run:
    assets: [common_data, database]
The above example assumes there are published assets named common_data,
database, and reference_docs in your pSeven Enterprise deployment. When
your block starts, pSeven Enterprise reads its manifest and, for each name
<asset_name> in edit.assets and run.assets, populates the block
environment with a variable named DA__P7__BLOCK__ASSET__<ASSET_NAME>, where
<ASSET_NAME> is the uppercased name of an asset. The block should read that
variable to get the <asset_name> folder path, which it can use.
Continuing the example above, the following environment variables would be added:
DA__P7__BLOCK__ASSET__COMMON_DATAcontaining the path to thecommon_dataasset folder,DA__P7__BLOCK__ASSET__DATABASEcontaining the path to thedatabaseasset folder, andDA__P7__BLOCK__ASSET__REFERENCE_DOCScontaining the path to thereference_docsasset folder.
In the block code, you can use values of those environment variables to obtain
paths to asset files. For example, to get the path to the material.db file
from the database asset:
import os

# path to the asset folder containing database files
db_folder_path = os.environ['DA__P7__BLOCK__ASSET__DATABASE']
# path to the material.db file in that asset
db_file_path = os.path.join(db_folder_path, 'material.db')
Using assets to add Python modules
As noted in section Adding Python modules, the
preferred way to add custom Python modules to your block is to install the
module distribution to the block prototype using pip install. By installing
modules to the block prototype, you avoid creating external code dependencies,
which helps maintaining and updating the block. However if you need a module
that cannot be installed with pip - for example, a module from a privately
developed distribution - you can publish an asset containing that distribution
and import modules from there.
For example, assume that your block requires modules from several private
packages named private_sdk, private_lib, and so on. You can make them
available to the block as follows:
- Prepare an asset folder containing all required distributions. The folder
name should contain only lowercase English letters, digits, and
underscores - for example,
private_python. In the example, the folder structure would be like the following:private_python/- the asset folderprivate_sdk/- a package folderprivate_lib/- another package folder- ...other packages
- Publish the
private_pythonasset as described in Publishing and updating assets. The block environment variable corresponding to yourprivate_pythonasset will be namedDA__P7__BLOCK__ASSET__PRIVATE_PYTHON. Its value will be the path to the published asset folder containing your private Python distributions. -
In your block startup scripts, add the path stored in the
DA__P7__BLOCK__ASSET__PRIVATE_PYTHONenvironment variable to the Python module search path stored in thePYTHONPATHblock environment variable:- Locate the block startup scripts. The paths to those scripts are
specified by the
edit.execandrun.execparameters in the block's manifest (manifest.yaml). In the user block example provided by pSeven Enterprise, there are two such scripts:scripts/start.sh(for Linux) andscripts/start.bat(for Windows). -
In startup scripts, find the commands that set the
PYTHONPATHvariable and append the value ofDA__P7__BLOCK__ASSET__PRIVATE_PYTHONtoPYTHONPATH. For example:# Set PYTHONPATH so that Python finds the block code. export PYTHONPATH="$DA__P7__BLOCK__CODE_DIR:$DA__P7__BLOCK__ASSET__PRIVATE_PYTHON":: Set PYTHONPATH so that Python finds the block code. set PYTHONPATH="%DA__P7__BLOCK__CODE_DIR%;%DA__P7__BLOCK__ASSET__PRIVATE_PYTHON%"
- Locate the block startup scripts. The paths to those scripts are
specified by the
-
You can now import modules from the
private_pythonasset as usual:import private_lib from private_sdk import utilsThe block will search for modules and packages in the directories listed by the
PYTHONPATHvariable and find theprivate_libandprivate_sdkpackages in the publishedprivate_pythonasset.
Testing and debugging a custom block
Typically, some debug workflow is used to test a block during its development. Open the debug workflow and follow these steps to load your block into the workflow library:
- Upload the block prototype to your pSeven Enterprise home directory:
drag the
.p7protoblockfolder containing the block code from your local folder to the Explorer pane in pSeven Enterprise. Wait for the upload to complete. Please note that you should upload the folder itself, not a ZIP archive containing that folder. - Load the block prototype into the library: in the Explorer pane, select the prototype folder you have uploaded, and drag it onto the Workflow library pane.
- Optionally, delete the block prototype folder from your pSeven Enterprise home directory. That copy is no longer needed as the block prototype is now stored in the workflow library, and the workflow will load it from the library as required.
As a result of these steps, your block will appear in the library, ready to be added to the workflow.
Important
To load a block prototype into the library, you must have the
app_auth | user | Can develop blocks permission; otherwise, you cannot
drag the prototype folder from your home directory onto the
Workflow library pane. By default, each pSeven Enterprise user
has this permission, but the administrator can remove it for
individual users. Such users will not be able to develop blocks.
You can load a new block prototype without changing the block ID and version in the manifest. This will replace the block code in the library and in the workflow with the block code from the prototype folder. This feature allows you to quickly test changes in the block code.
Important
When testing and debugging a block on a Windows extension node, you must add the DEV tag to the block's manifest; otherwise, your changes in the block code might conflict with the earlier state of the block stored in the node's local cache. For details on the DEV tag, refer to section Tagging the block under development.
If you load a new block prototype with the same ID and an increased version number, the new block appears in the workflow library along with the old one. This new block version does not automatically replace the old one in the workflow. To replace the block in the workflow, you need to click the update notification next to the old block in the Workflow library pane. This allows you to test the steps that the users of the block will need to follow after a new block version is published to the common library.
Observe the following basic rules when testing and debugging a custom block:
- Change the block ID only if you intend to design a new block rather than a new version of an existing block. For a new version of a block, leave the existing block ID unchanged.
- While testing a new version of a block, keep the same version number in the
block's manifest: do not change the
versionparameter in themanifest.yamlfile before you load the block into the workflow library. When loaded with the same ID and version number, the updated block automatically replaces the existing one in the library and in the workflow. - Use the DEV tag when testing the new version of the block on a Windows extension node (see Tagging the block under development).
- Do not manually delete the old block from the workflow library, as this will remove the block from the workflow. After you upgrade the block in the library, it will be automatically upgraded in the workflow.
Publishing a custom block
To publish a new block to the common library, you need an administrator account. Admins can publish blocks in pSeven Enterprise Studio UI or by copying a block prototype folder to the the shared data storage. The second method does not require sign-in and can be integrated with CI/CD.
To publish a block from Studio UI:
- Sign in to the pSeven Enterprise user interface as an administrator.
Note this sign-in requires the
app_auth | user | Can access Studio and AppsHubpermission, which is typically removed from admin accounts during their initial setup (see Admin account configuration). - Upload the block prototype folder (
.p7protoblock) - you can drag it to the Explorer pane. - Create a new workflow, open the Block library pane and expand its Common library section.
- Drag the block prototype folder from Explorer в Common library. Wait until the block setup completes, and the new block appears in Common library.
When you publish a block from Studio, it becomes available to users as soon as you see it in Common library.
To publish a block by copying it to shared data:
- Connect to the shared data storage server.
Its location is specified by the
storage.shareddata.*parameters invalues.yaml. - Copy the block prototype folder (
.p7protoblock) to the{shareddata}/protoblocksfolder on the server, where{shareddata}stands for the location of the shared data storage. -
Set up file access. pSeven Enterprise connects to the storage as a system user with UID 11111. That system user needs read access to all files in the
protoblocksfolder. There are several ways to set the required permissions, commonly one of the following:-
Set UID 11111 as the owner of the
protoblocksfolder and its contents, recursively (-R), and set read-only mode. This method is recommended although it also requires root privileges on the storage server.chown -R 11111:11111 protoblocks/ && chmod -R 550 protoblocks/This way, only pSeven Enterprise will have access to block files, and this access is read-only.
-
Allow read-only access to the
protoblocksfolder and its contents (-R) for everyone:chmod -R 755 protoblocks/This way any user, including the system user 11111, can read block files.
-
When you publish a block by copying it to the storage, it becomes usable only after you set the file access permissions correctly.
Publishing block updates
When a new version of the block is ready to publish, a pSeven Enterprise
deployment administrator can upgrade the block using the same methods as publishing:
either in the Studio UI, or
by copying the .p7protoblock folder of the new version
to the protoblocks folder in the shared data storage.
The block prototype of the new version should be prepared and packaged as follows:
- Verify the
versionparameter value in the block's manifest. When you publish a new version of your block, increment theversionparameter value from the previous version. - Test the new version of the block for backward compatibility to ensure that it works correctly with the configurations saved by any earlier version of that block.
- Do not change the block ID. Otherwise, the new version will be considered a new block, different from the one you intend to update.
- Remove the DEV tag from the
tagsparameter in the block's manifest (see Tagging the block under development for details). - Pack the new block version into a folder with a name that contains the
new version number, for example
<block-name>-<ID>-<new-version-number>.p7protoblock.
An administrator can upload the new block prototype folder into Studio and publish the block there,
or copy that folder to the protoblocks folder in the shared data storage.
Either way, it is advisable to also keep the existing (previous) versions of the block.
There is no need to delete them,
as the Common library pane displays only the latest version of the block to users.
Keeping previous versions gives you the option to quickly revert an unwanted update in case of errors.
In case of a version conflict, when two folders with the same ID and version number
in the block manifest are copied to the protoblocks folder in the storage,
the Common library pane does not display this block, thus indicating that the update has failed.
If you update a block by copying it to the storage, make sure that
the block is displayed correctly in the Common library pane when you finish.
Upgrading the block in the workflow
After the publication of a new block version, users can upgrade the block in their workflows. The Workflow library pane displays the new block version along with the old one, and proposes to upgrade the block in the workflow. To upgrade the block, click the update notification next to the old version of the block in the Workflow library pane.
The workflow uses the old block version until you upgrade it. The upgrade replaces the block with the new version in the workflow, and removes the old block version from the workflow library. If needed, you can undo these changes, having the workflow revert to the old block version.
You should not delete the old block version from the workflow library before the upgrade as you cannot upgrade the block if it is deleted. However, if a block was deleted by accident or by mistake, you can undo the deletion. Note that the old block version is automatically removed from the workflow library after you upgrade the block.
Typesystem
pSeven Enterprise typesystem is extensible.
For example, based on the built-in "real number" type,
you can define your own type "real number in the range from 1.0 to 18.0".
Such extended types are defined in the block manifest - that is,
there is no common registry of type definitions.
Consequently, there is no strict typing:
blocks exchange data as JSON objects,
and the data structures they contain (the "data" field) can be anything.
Your block declares what data types it expects on the input ports (1) -
but this does not guarantee that it will only receive those types when running.
In run mode, your block must handle any input data structure,
converting the data to another type if required, or
stopping with a specific error message if the conversion is not possible.
- the
schemasport property inmanifest.yaml
Example: integer input port
Let the block algorithm require an integer parameter N,
which the block receives through an input port.
There is no way to set up the port N so it only accepts integers:
it'll accept any value and pass it to the block process.
When you develop the block,
you have to implement relevant checks and conversion rules - for example:
- If the value is a table, matrix, or another kind of array containing a single element, continue with that element (preferred behavior). Or: stop with an error, requiring the user to fix the workflow so that the value is scalar (acceptable but inconvenient for the user).
- If the value is an array that contains two or more elements,
stop with an error informing the user that
the value received to
Nmust contain a single integer. - If the value is a string, try its conversion to a number. If the string does not represent a number, stop with an error.
- If the value is a non-integer number, stop with an error. Or: round it to the nearest integer, issue a warning about that to the run log, continue execution - and so on.
Port type declaration is necessary because it ensures that users cannot assign an invalid value to the port while editing the block settings. For example, when they open the Edit value dialog for a port, it'll only allow editing those types you have declared for that port. The dialog validates input values, so users simply cannot save a value of an incorrect type. If they try to do so, they'll get an error immediately in the dialog, and not later during a workflow run, once the block reads the value.
The data types expected by a port are described by its schemas property in manifest.yaml.
That property is a list of JSON schemas;
in block development, each schema in this list can be understood as a single type definition.
The schemas are used, for example, by the Edit value dialog
when it validates the value entered by the user.
Note that port schemas aren't used for data validation during the workflow execution,
and aren't checked when users link ports - that is,
there is no concept of data type compatibility for ports.
The port's schemas determine the data types that can be used
when editing (assigning) the port value;
this is the only purpose of port schemas.
pSeven Enterprise defines the base JSON schemas. Those can be understood as base data types: integer, float, string, list, dictionary, and so on. You can use the base types in your port schemas by referencing ($ref). For example:
-
Real number
inputs: "port_name": schemas: [{ $ref: "r" }] -
General list, element type not restricted
inputs:
  "port_name":
    schemas: [{ $ref: "l" }]
If you need a non-default type - for example,
a numeric type with additional restrictions -
you can define a custom type, which adds certain properties to a base one.
To do this, use the allOf
composition
where the first element is a $ref reference to the base type you inherit from.
For example:
-
Real number from the right-open interval [1.0, 18.0). Restricts the base real number type (
{ $ref: "r" }).{ title: "Geometry parameter", description: "A geometry parameter that must be less than 18.0 but not less than 1.0", allOf: [ { $ref: "r" }, { minimum: 1.0, exclusiveMaximum: 18.0 } ] } -
List of strings. Restricts the base list type
{ $ref: "l" }to only allow string elements{ $ref: "s" }.{ title: "Strings", description: "A list that can only contain strings", allOf: [ { $ref: "l" }, { items: { $ref: "s" } } ] } -
A parameter that can only take values from a predefined list. Uses the base enumeration type
{ $ref: "e" }.{ title: "Units", description: "Supported length units", allOf: [ { $ref: "e" }, { enum: ["mm", "cm", "m"] } ] }
Base types
This section lists the base JSON schemas defined in pSeven Enterprise by default. In block development, they essentially define the base data types. Reference ($ref) the base schemas when you create you own JSON schemas for custom data types.
- Real
{ $ref: "r" } - Integer
{ $ref: "i" } - Boolean
{ $ref: "b" } - String
{ $ref: "s" } - Secret string
{ $ref: "st" } - Enumeration
{ $ref: "e" } - List
{ $ref: "l" } - Dictionary
{ $ref: "d" } - Vector
{ $ref: "v" } - Matrix
{ $ref: "m" } - Table
{ $ref: "t" } - Binary data (blob)
{ $ref: "bn" }
Real number ({ $ref: "r" }).
Special values: inf, infinity, nan (not a number);
case insensitive.
{
    "$schema": "http://json-schema.org/draft-07/schema#",
    "$id": "r",
    "title": "Real",
    "description": "A default Real type",
    "oneOf": [
        { "type": "number" },
        {
            "type": "string",
            "pattern":
                "^[+-]?([Ii][Nn][Ff][Ii][Nn][Ii][Tt][Yy]|[Ii][Nn][Ff]|[Nn][Aa][Nn])$"
        },
        { "$ref": "n" }
    ],
    "default": 0.0
}
Integer number ({ $ref: "i" }).
{
    "$schema": "http://json-schema.org/draft-07/schema#",
    "$id": "i",
    "title": "Integer",
    "description": "A default Integer type",
    "oneOf": [{ "type": "integer" }, { "$ref": "n" }],
    "default": 0
}
String ({ $ref: "s" }).
{
    "$schema": "http://json-schema.org/draft-07/schema#",
    "$id": "s",
    "title": "String",
    "description": "A default String type",
    "oneOf": [{ "type": "string" }, { "$ref": "n" }],
    "default": ""
}
Secret string ({ $ref: "st" }).
Values of this type are never logged, and you can't get them in APIs (but can set).
{
    "$schema": "http://json-schema.org/draft-07/schema#",
    "$id": "st",
    "title": "Secret",
    "description": "A default Secret type",
    "oneOf": [{ "type": "string" }, { "$ref": "n" }],
    "default": null,
    "@nullStr": "<not set>"
}
Boolean value ({ $ref: "b" }).
{
    "$schema": "http://json-schema.org/draft-07/schema#",
    "$id": "b",
    "title": "Boolean",
    "description": "A default Boolean type",
    "type": "boolean",
    "default": true
}
Enumeration ({ $ref: "e" }).
{
    "$schema": "http://json-schema.org/draft-07/schema#",
    "$id": "e",
    "title": "Enumeration",
    "description": "A default Enumeration type",
    "type": "string",
    "default": ""
}
List ({ $ref: "l" }).
{
    "$schema": "http://json-schema.org/draft-07/schema#",
    "$id": "l",
    "title": "List",
    "description": "A default List type",
    "type": "array",
    "items": {},
    "default": []
}
Dictionary ({ $ref: "d" }).
{
    "$schema": "http://json-schema.org/draft-07/schema#",
    "$id": "d",
    "title": "Dictionary",
    "description": "A default Dictionary type",
    "type": "object",
    "additionalProperties": true,
    "default": {}
}
Vector ({ $ref: "v" }).
All vector elements must have the same type.
That is: real vector, integer vector, or string vector.
{
    "$schema": "http://json-schema.org/draft-07/schema#",
    "$id": "v",
    "title": "Vector",
    "description": "A default Vector type",
    "anyOf": [
        { "type": "array", "items": { "$ref": "r" } },
        { "type": "array", "items": { "$ref": "i" } },
        { "type": "array", "items": { "$ref": "s" } },
    ],
    "default": []
}
Matrix ({ $ref: "m" }).
All matrix elements must have the same type.
That is: real matrix, integer matrix, or string matrix.
{
    "$schema": "http://json-schema.org/draft-07/schema#",
    "$id": "m",
    "title": "Matrix",
    "description": "A default Matrix type",
    "anyOf": [
        { "type": "array", "items": { "type": "array", "items": { "$ref": "i" } } },
        { "type": "array", "items": { "type": "array", "items": { "$ref": "r" } } },
        { "type": "array", "items": { "type": "array", "items": { "$ref": "s" } } },
    ],
    "default": [[]]
}
Table ({ $ref: "t" }).
{
    "$schema": "http://json-schema.org/draft-07/schema#",
    "$id": "t",
    "title": "Table",
    "description": "A default Table type",
    "type": "object",
    "properties": {
        "columns": {
            "type": "array",
            "items": {
                "type": "string"
            }
        },
        "data": {
            "type": "object",
            "patternProperties": {
                "^.*$": {
                    "anyOf": [
                        { "type": "array", "items": { "$ref": "r" } },
                        { "type": "array", "items": { "$ref": "i" } },
                        { "type": "array", "items": { "$ref": "s" } },
                        {
                            "type": "array",
                            "items": { "oneOf": [{ "$ref": "b" }, { "$ref": "n" }] }
                        },
                        {
                            "type": "array",
                            "items": { "oneOf": [{ "$ref": "e" }, { "$ref": "n" }] }
                        },
                        {
                            "type": "array",
                            "items": { "oneOf": [{ "$ref": "l" }, { "$ref": "n" }] }
                        },
                        {
                            "type": "array",
                            "items": { "oneOf": [{ "$ref": "d" }, { "$ref": "n" }] }
                        },
                        {
                            "type": "array",
                            "items": { "oneOf": [{ "$ref": "v" }, { "$ref": "n" }] }
                        },
                        {
                            "type": "array",
                            "items": { "oneOf": [{ "$ref": "m" }, { "$ref": "n" }] }
                        },
                        {
                            "type": "array",
                            "items": { "oneOf": [{ "$ref": "t" }, { "$ref": "n" }] }
                        }
                    ]
                }
            }
        }
    },
    "additionalProperties": false,
    "required": ["data"],
    "default": { "columns": [], "data": {} }
}
Binary data ({ $ref: "bn" }).
Base64-encoded byte array (blob).
{
    "$schema": "http://json-schema.org/draft-07/schema#",
    "$id": "bn",
    "title": "Binary",
    "description": "A default Binary type",
    "type": "string",
    "contentEncoding": "base64",
    "default": ""
}