pSeven Enterprise Express
pSeven Enterprise is a collaborative web platform that enables engineering teams to efficiently manage integration and process automation tasks. In production, it is typically deployed on a Kubernetes cluster. This deployment relies on a set of the host infrastructure services - Kubernetes, Distribution Registry, NFS, PostgreSQL - to provide a scalable, fault-tolerant environment optimized for enterprise workloads.
Express is an all-in-one distribution designed to streamline deployment for evaluation and initial adoption of pSeven Enterprise. It offers the full-featured pSeven Enterprise version that can be deployed as a single virtual machine (VM). The deployment package is a ready-to-boot disk image compatible with major hypervisors and virtualization platforms. It contains a pre-installed OS with all required services and the standard pSeven Enterprise distribution, which is automatically installed into the VM on first boot. This installation supports the basic pSeven Enterprise license, making it ideal for evaluations and small production teams. It provides the complete pSeven Enterprise user experience with only minor limitations.
You can run the pSeven Enterprise Express VM on your preferred virtualization platform. If you have not chosen one yet, KVM is recommended. Other tested environments include Azure, VMware ESXi, Hyper-V, and VirtualBox.
Users access pSeven Enterprise Express via a web browser, so network visibility between user devices and the Express VM is required.
For resource-intensive tasks like engineering simulations, pSeven Enterprise Express can offload them to additional Windows or Linux servers running simulation software, or to HPC clusters. This offloading also requires network visibility between those servers and the Express VM.
Additional Windows servers are required if users need to run Windows software in their tasks. Such servers should be set up as pSeven Enterprise extension nodes. The node setup package installs new Windows services and modifies several system settings. Extension nodes must be accessible exclusively by pSeven Enterprise Express to ensure proper resource management for user tasks.
System requirements
Required VM resources:
- ≥16 CPU cores
- ≥64 GB RAM
- ≥100 GB system disk (10000/5000 IOPS read/write minimum)
-
Additional data storage disk, set up for scheduled maintenance and backup; (1) ≥400 GB recommended (10000/5000 IOPS read/write minimum)
- The storage disk will contain the user database and all user files: working documents, custom runtime images, and other. This disk will also store your license key and installation ID. This is the most important data that you have to back up; the VM does not back it up automatically.
Required VM network connections and ports:
- Inbound SSH 22/tcp and HTTP 4444/tcp - for admin
-
Inbound HTTP 80/tcp - for users (1)
- It is strongly recommended that you secure this connection with a reverse proxy providing SSL/TLS termination and block any direct connections to port 80.
-
Inbound HTTP 5000/tcp - for admin and developers
- Inbound OpenVPN 31194/udp - for Windows extension nodes
Optional Windows extension nodes:
-
Physical Windows 10 workstation or a standalone server (1)
- If using a server, it must not be an Active Directory domain controller.
-
Windows 10 Pro 64-bit, version 1909 or newer; Windows Server 2019 or newer
-
Hardware: as required by the engineering software running on the node (1)
- Commonly: ≥8 CPU, ≥32 GB RAM, ≥1 TB storage.
-
Clock synchronization (NTP)
Package contents
-
pSeven Enterprise Express v{YYYY.MM.DD}.qcow2(1) - VM boot disk image in qcow2 format. Depending on your virtualization environment, this image may be provided in VMDK or VHDX format.v{YYYY.MM.DD}is the release version, for example:pSeven Enterprise Express v2025.05.20.qcow2
Boot image details
- OS: Ubuntu Server 24.04 (user:
sysadmin, password:sysadmin) - Kubernetes: K3s v1.32.2
- Helm v3.17.1
- PostgreSQL v17.4 available internally on
172.31.242.2:5432(user:pseven, password:pseven) - System Distribution Registry v2.8.3 -
for pSeven Enterprise images only, available internally on
172.31.242.3:5000 - Developer Distribution Registry v2.8.3 -
for custom runenv images, available externally on
http://{VM address}:5000 - pSeven Enterprise available externally on port 80
(admin URL:
http://{VM address}/admin/, user:admin, password:admin)
Data storage disk
pSeven Enterprise Express requires an additional disk for database and file storage. You have to add this disk during the deployment; it is not a part of the package.
Deployment
The general setup steps described in this section are always required. Additional guidelines are available for:
- KVM - recommended default
- Microsoft Azure
- Microsoft Hyper-V
- VMware ESXi
If you're deploying to one of those, see the respective section first. Then, complete all of the deployment steps below, starting with step 2.
-
Configure a VM with the following settings:
- CPU: 16 or more cores
- RAM: 64 GB or more
- Network adapter attachment type: bridged adapter
- Only for Proxmox, QEMU, KVM:
- Network adapter type: virtio
- Storage controller type: virtio-scsi
- Only for VMware Workstation:
- Network adapter type: vmxnet3
- Storage controller type: virtual SCSI
- Hard disks:
- Attach
pSeven Enterprise Express v{YYYY.MM.DD}.qcow2- this is the boot disk - Create and attach an empty disk for data storage, 400 GB or greater
- Attach
Never change the storage disk label
Editing the label will cause errors and user data loss. pSeven Enterprise Express uses the disk label to track the storage state when performing the storage maintenance tasks.
-
Start the VM, let it boot and continue with the pSeven Enterprise Express installation. The installation starts automatically on the first boot and usually takes 20-40 minutes to complete.
- Connect to
http://{VM address}:4444/with a web browser to see the installation log. Once the installation is complete, you'll see the final log message: "pSeven Enterprise is ready." - During the installation, you can continue with the VM setup steps below, which don't require sign-in to pSeven Enterprise.
- Connect to
-
Secure the SSH access to the VM.
-
Sign in to the VM, or connect to it using SSH. User:
sysadmin, password:sysadmin.The VM has password-based SSH authentication enabled by default.
-
Change the default password for the
sysadminuser in the VM.passwd sysadmin -
Set up the VM to use key-based authentication or 2FA for SSH. Be advised to disable the default password-based SSH authentication after you have set up a safer method.
For guidelines, see Configure OpenSSH in the Ubuntu Server documentation.
-
-
While signed in, create accounts in the developer Registry for the users who will manage custom runenvs. In the VM, use this command and set a password for the user when prompted:
# Username must not begin with @
htpasswd -B /Storage/pSeven/Registry/registry.htpasswd {username}
Don't use
@names- they are reserved by pSeven Enterprise. -
The VM is set up with DHCP enabled by default. This is the recommended IP configuration. If your network policy requires you to assign static IPs, see Static IP address assignment in the Ubuntu Server documentation.
-
Secure the network access to the VM. Block all inbound connections except the protocols and ports listed below. For any port you open, only allow connections from specific networks or IPs.
- SSH 22/tcp and HTTP 4444/tcp - for admin access. Allow connections from the admin IPs, block all others.
-
HTTP 80/tcp - for user access. Allow connections from the user and admin IPs, block all others.
Set up SSL/TLS termination
It is strongly recommended that you secure this connection with a reverse proxy providing SSL/TLS termination and block any direct connections to port 80. See for details:
-
HTTP 5000/tcp - for adding custom runenv images to the developer Registry. Allow connections from the admin and developer IPs; block all others.
- OpenVPN 31194/udp - for Windows extension nodes. Allow connections from the hosts that are used as extension nodes; block all others.
-
Check the installation log at
http://{VM address}:4444/. Once you see the final message ("pSeven Enterprise is ready"), open{VM address}/admin/with a web browser to go to the admin sign-in page. Complete the following steps:- Sign in with the default credentials (user:
admin, password:admin) and secure the admin account. - Set up your license.
- Set up the admin account.
- Add user accounts and assign user roles.
- Back up the data storage disk.
If the final message does not appear or there is another problem with your installation, refer to the Troubleshooting section.
- Sign in with the default credentials (user:
Windows extension nodes
Adding Windows extension nodes is an optional feature, which enables users to integrate Windows software with pSeven Enterprise. Such nodes can be added immediately after completing the VM setup or at any later time.
To ensure proper resource management in user tasks, extension nodes should run only pSeven Enterprise workloads.
To add an extension node, you'll have to install a setup package there. The setup installs a few new Windows services and modifies several system settings on the node. The package you'll need is specific to your deployment: it is generated during the pSeven Enterprise installation, so you have to complete the VM setup first.
For further details, see the extension node deployment guide.
Backups
Set up scheduled backups for the data storage disk, which you have created and attached to the VM during the deployment. This disk contains all user work, as well as your license and installation ID.
Additionally, always back up the data storage disk before you perform a pSeven Enterprise version upgrade.
Never change the data storage disk label
Editing the storage disk label will cause errors and user data loss. pSeven Enterprise Express uses the disk label to track the storage state during version upgrades and when it performs the storage maintenance tasks.
Version upgrade
Upgrading to a newer version of pSeven Enterprise Express requires deploying a new VM with that version and migrating the existing data storage disk to it. Downgrades or rollbacks are not supported - back up before you upgrade.
- Shutdown the pSeven Enterprise Express VM.
- Back up the data storage disk.
- Detach the data storage disk from the existing VM.
- Deploy a new VM:
- Use the qcow2 image of the new version as a boot disk.
- Attach the existing data storage disk.
- Complete all steps in the Deployment section with the new VM.
Never migrate the data storage from a newer to an older version
Once you attach the data storage disk to a new VM version and start it, this storage is no longer compatible with previous versions of pSeven Enterprise Express. Any attempt to run a previous version of the VM with this storage attached will corrupt user files in the storage.
Version upgrade keeps the user data and pSeven Enterprise settings as long as you use the existing data storage disk. The license key and your installation ID are also saved on that disk and are kept during the upgrade. The license you've initially registered will be valid up to its maximum supported version and expiry date - see the license properties in the pSeven Enterprise admin interface.
Custom runtime environments
pSeven Enterprise Express supports custom runtime environments (runenvs) for user blocks.
Guide the block developers to upload runenv images
to the developer Registry at {VM address}:5000. (1)
Provide them with the developer Registry accounts you've created during the deployment.
- This address depends on your IP and network access settings for the pSeven Enterprise Express VM. It can be the VM's static IP, VM's hostname, or other.
docker login {VM address}:5000  # requires username and password
docker push {VM address}:5000/{runenv image name}
Developers can use any custom runenv from the developer Registry if they specify it in the block's manifest.
# For edit mode.
edit:
  require: "{runenv image name}"
# For run mode.
run:
  require: "{runenv image name}"
Limitations
-
pSeven Enterprise Express isn't scalable as a pSeven Enterprise deployment on a Kubernetes cluster, and its performance is limited by the VM performance.
In a Kubernetes deployment, you can add and remove worker nodes, or reconfigure existing nodes to allow or deny running tasks from pSeven Enterprise on them. Thus a Kubernetes deployment can adjust to changes in the number of users and in the workload.
pSeven Enterprise Express can only support a few active users and is not suitable for heavy workloads.
-
pSeven Enterprise Express does not support sending e-mails to users, such as password reset links or status notifications.
- The total number of user accounts ever created can't exceed 32 - including the deactivated and deleted accounts. That is, 32 is not the number of the active user accounts; it is the maximum number of non-reusable unique user account IDs (see Understanding accounts for details). If you had already created 32 user accounts, you can't create any more, even if you delete some of the existing accounts.
- The maximum number of workspaces is 32. This limits the number of existing workspaces only - that is, if you reach this limit, you can delete some workspaces to create new ones.
Troubleshooting
Before you attempt troubleshooting,
check the installation log at http://{VM address}:4444/.
-
The deployment has stopped because the data storage disk is not attached:
- Shut down the VM normally.
- Attach the data storage disk.
- Start the VM and let it continue with the pSeven Enterprise installation.
-
The final message ("pSeven Enterprise is ready") does not appear in the installation log:
- If this your first installation attempt, restart the VM and let it continue with the installation.
- If the problem persists, gather diagnostic information and send it to support.
-
The installation is complete but the sign-in page doesn't load when you go to
http://{VM address}/admin/:- Sign in to the VM.
-
Check the state of the Kubernetes pods running inside the VM:
sudo kubectl get pod -n pseven | grep pseven-appserverThe state of the
pseven-appserver-*pods in the output should be "Running" - for example:pseven-appserver-deploy-78544f785f-4n87b 1/1 Running 0 1h pseven-appserver-deploy-78544f785f-68ctf 1/1 Running 0 1h pseven-appserver-deploy-78544f785f-dnh6c 1/1 Running 0 1h ... -
If the
pseven-appserver-*pods are not running, restart the VM and tryhttp://{VM address}/admin/again. - If the problem persists, gather diagnostic information and send it to support.
Gathering diagnostic information
- Get and save the installation log from
http://{VM address}:4444/. - Open
http://{VM address}:4444/logs/. Download and save all logs using the links from there. -
Sign in to the VM and run this command:
kubectl cluster-info dump --all-namespaces --show-managed-fields --output-directory=/tmp/pseven-cluster-stateIf it fails to collect the pod logs, adjust
--pod-running-timeout- for example:kubectl cluster-info dump --all-namespaces --show-managed-fields --pod-running-timeout=2m --output-directory=/tmp/pseven-cluster-state -
Get and save the
/tmp/pseven-cluster-statefrom the VM. - Submit your support request to support@pseven.io. Include the above diagnostics with your request.
KVM deployment
KVM is the default recommended choice for pSeven Enterprise Express. If you prepare a new virtualization platform, choose KVM. Otherwise, it is advisable to use your existing virtualization platform.
For KVM deployment, first set up a new VM in Virtual Machine Manager, following the guidelines in this section. Then complete all steps in the Deployment section, starting with step 2.
-
Launch Virtual Machine Manager and click the new VM button in the toolbar.
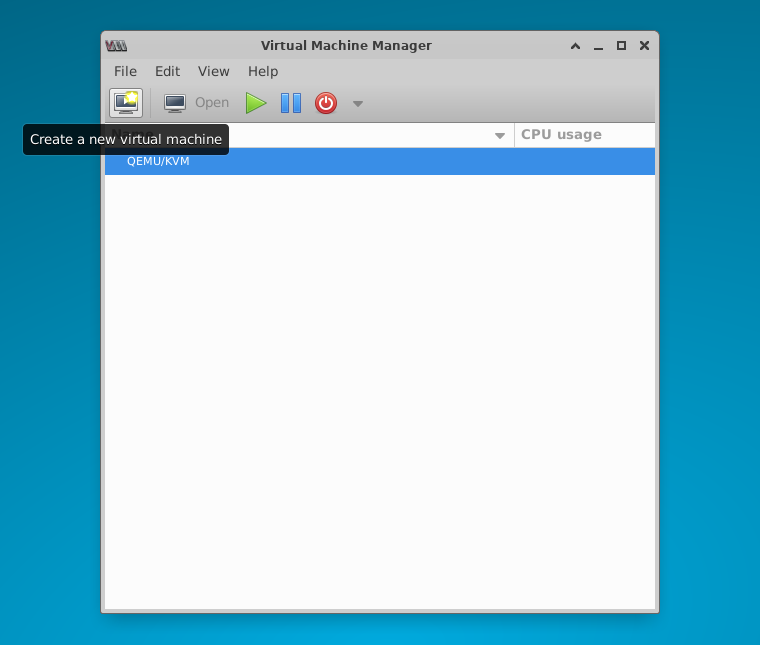
KVM - create a new VM in Virtual Machine Manager -
At step 1 of the New VM dialog that opens, select "Import existing disk image" and continue.

KVM - select "Import existing disk image" to attach the VM boot disk -
At step 2 of the New VM dialog:
- Browse and select the pSeven Enterprise Express qcow2 disk image.
- Choose the operating system: at the bottom, type "ubuntu" and select Ubuntu 24.04 LTS.
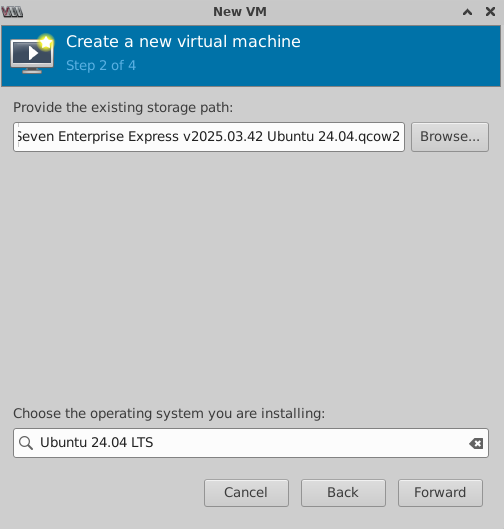
KVM - select the qcow2 disk image and OS Ubuntu 24.04 LTS -
At step 3 of the New VM dialog, set at least 64 GB RAM and 16 CPUs for the VM.
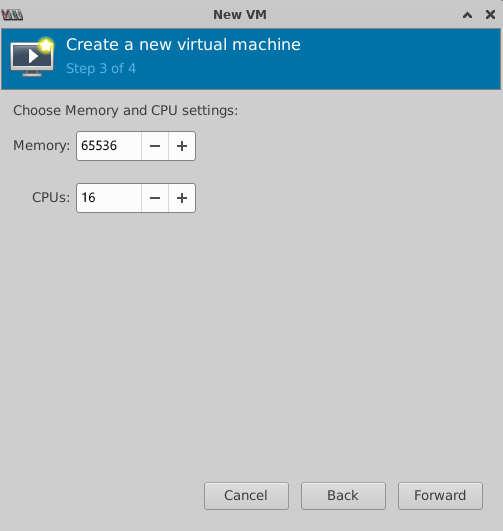
KVM - set 64 GB or more memory and 16 or more CPUs -
Before you continue to step 4 of the New VM dialog:
- Switch back to the main Virtual Machine Manager window.
- From the Edit menu, select Connection Details.
- In the Connection Details dialog that opens, switch to the Virtual Networks tab.
-
In the network details, check the device name. (1)
- Your KVM version might use another device name by default.
Commonly,
virbr0is the default name.
- Your KVM version might use another device name by default.
Commonly,
-
Leave all settings as is and close the Connection Details dialog.
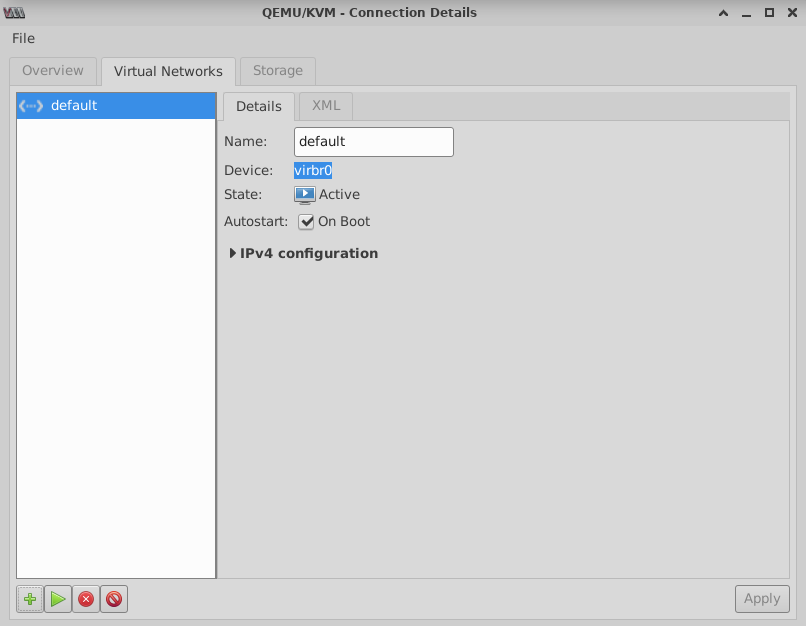
KVM - network device name required for the VM setup -
Back in the New VM dialog, continue to step 4. Name the VM as you choose, and change these settings:
- Enable "Customize configuration before install".
- Expand Network selection and select "Bridge device..." from the dropdown.
- In the device name field that appears,
enter the network device name from the Virtual Machine Manager settings
(commonly,
virbr0). - Check that your settings at step 4 are as shown. Click Finish to create the VM and continue with its configuration.
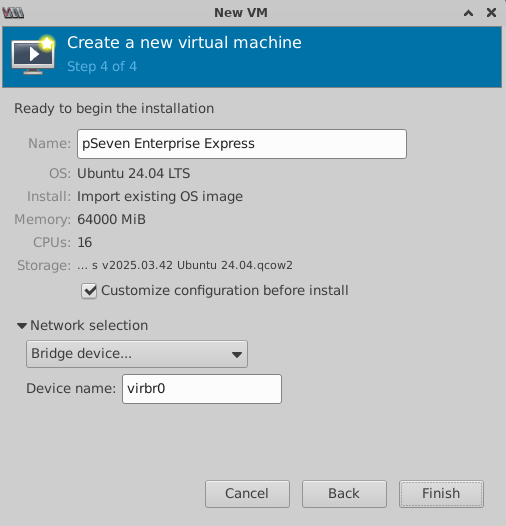
KVM - enable customized configuration, select bridged network, and enter the device name (default: virbr0) -
Clicking Finish in the New VM dialog opens the VM configuration dialog.
- Click Add Hardware at the bottom left to add a disk for data storage.
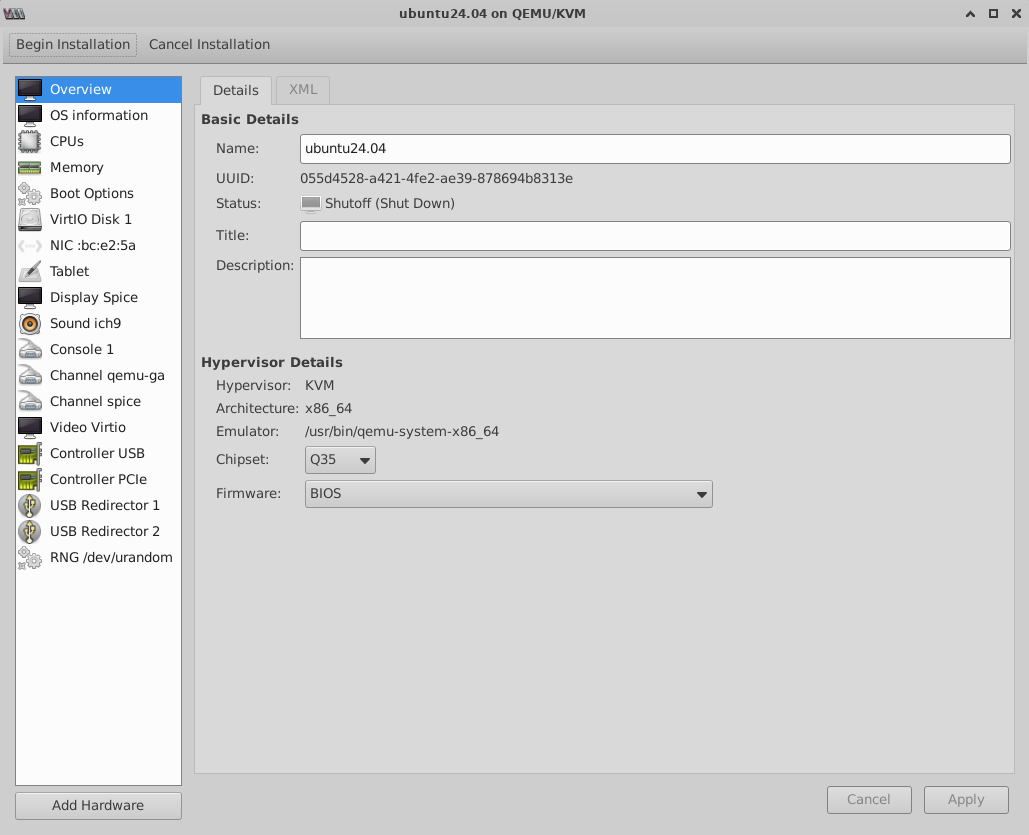
KVM - click Add Hardware to add a disk for data storage -
In the Add New Virtual Hardware dialog that opens, select "Storage" on the left.
- In storage details, choose to create a new disk image.
- Set the disk size to 400 GB or greater.
- Keep the other settings at their defaults and click Finish.
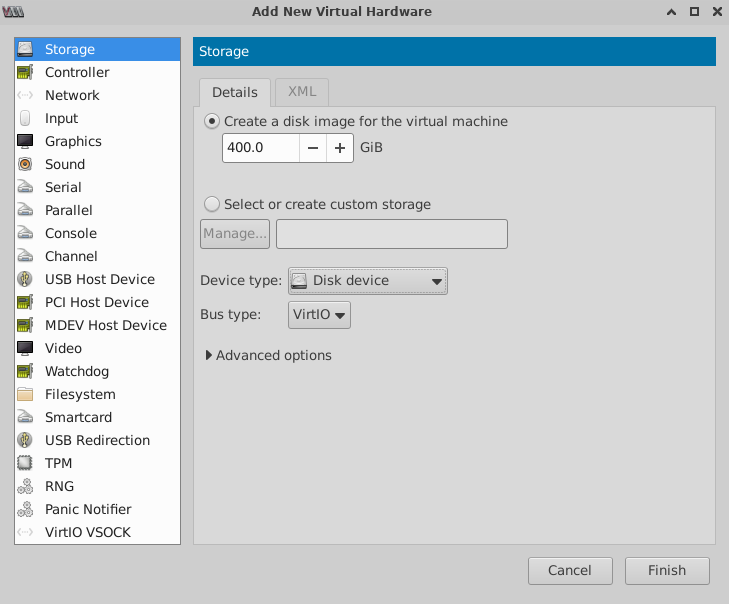
KVM - add a new disk for data storage, set its size to 400 GB or greater -
Back in the VM configuration dialog, check that there are two disks listed in the VM hardware.
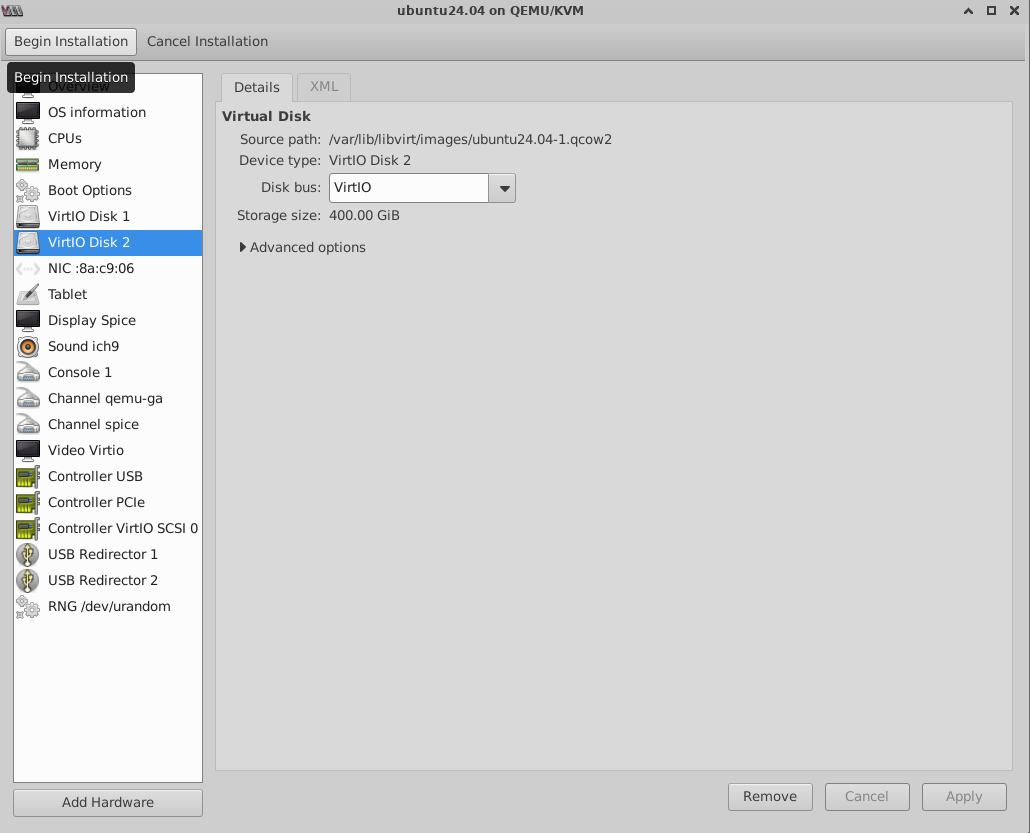
KVM - final VM configuration; click Begin Installation to boot the VM and proceed with the pSeven Enterprise Express installation -
To start the VM, click Begin Installation at the top left. The VM will boot and begin the pSeven Enterprise Express installation automatically. Continue with the deployment guide from step 2 onwards.
Microsoft Azure deployment
This section provides guidelines for pSeven Enterprise Express deployment in Microsoft Azure. Set up an Azure VM following these guidelines, then complete all steps in the Deployment section, starting with step 2.
-
The VM image definition should be available to you in Azure compute galleries. Click the definition name to add a new VM.
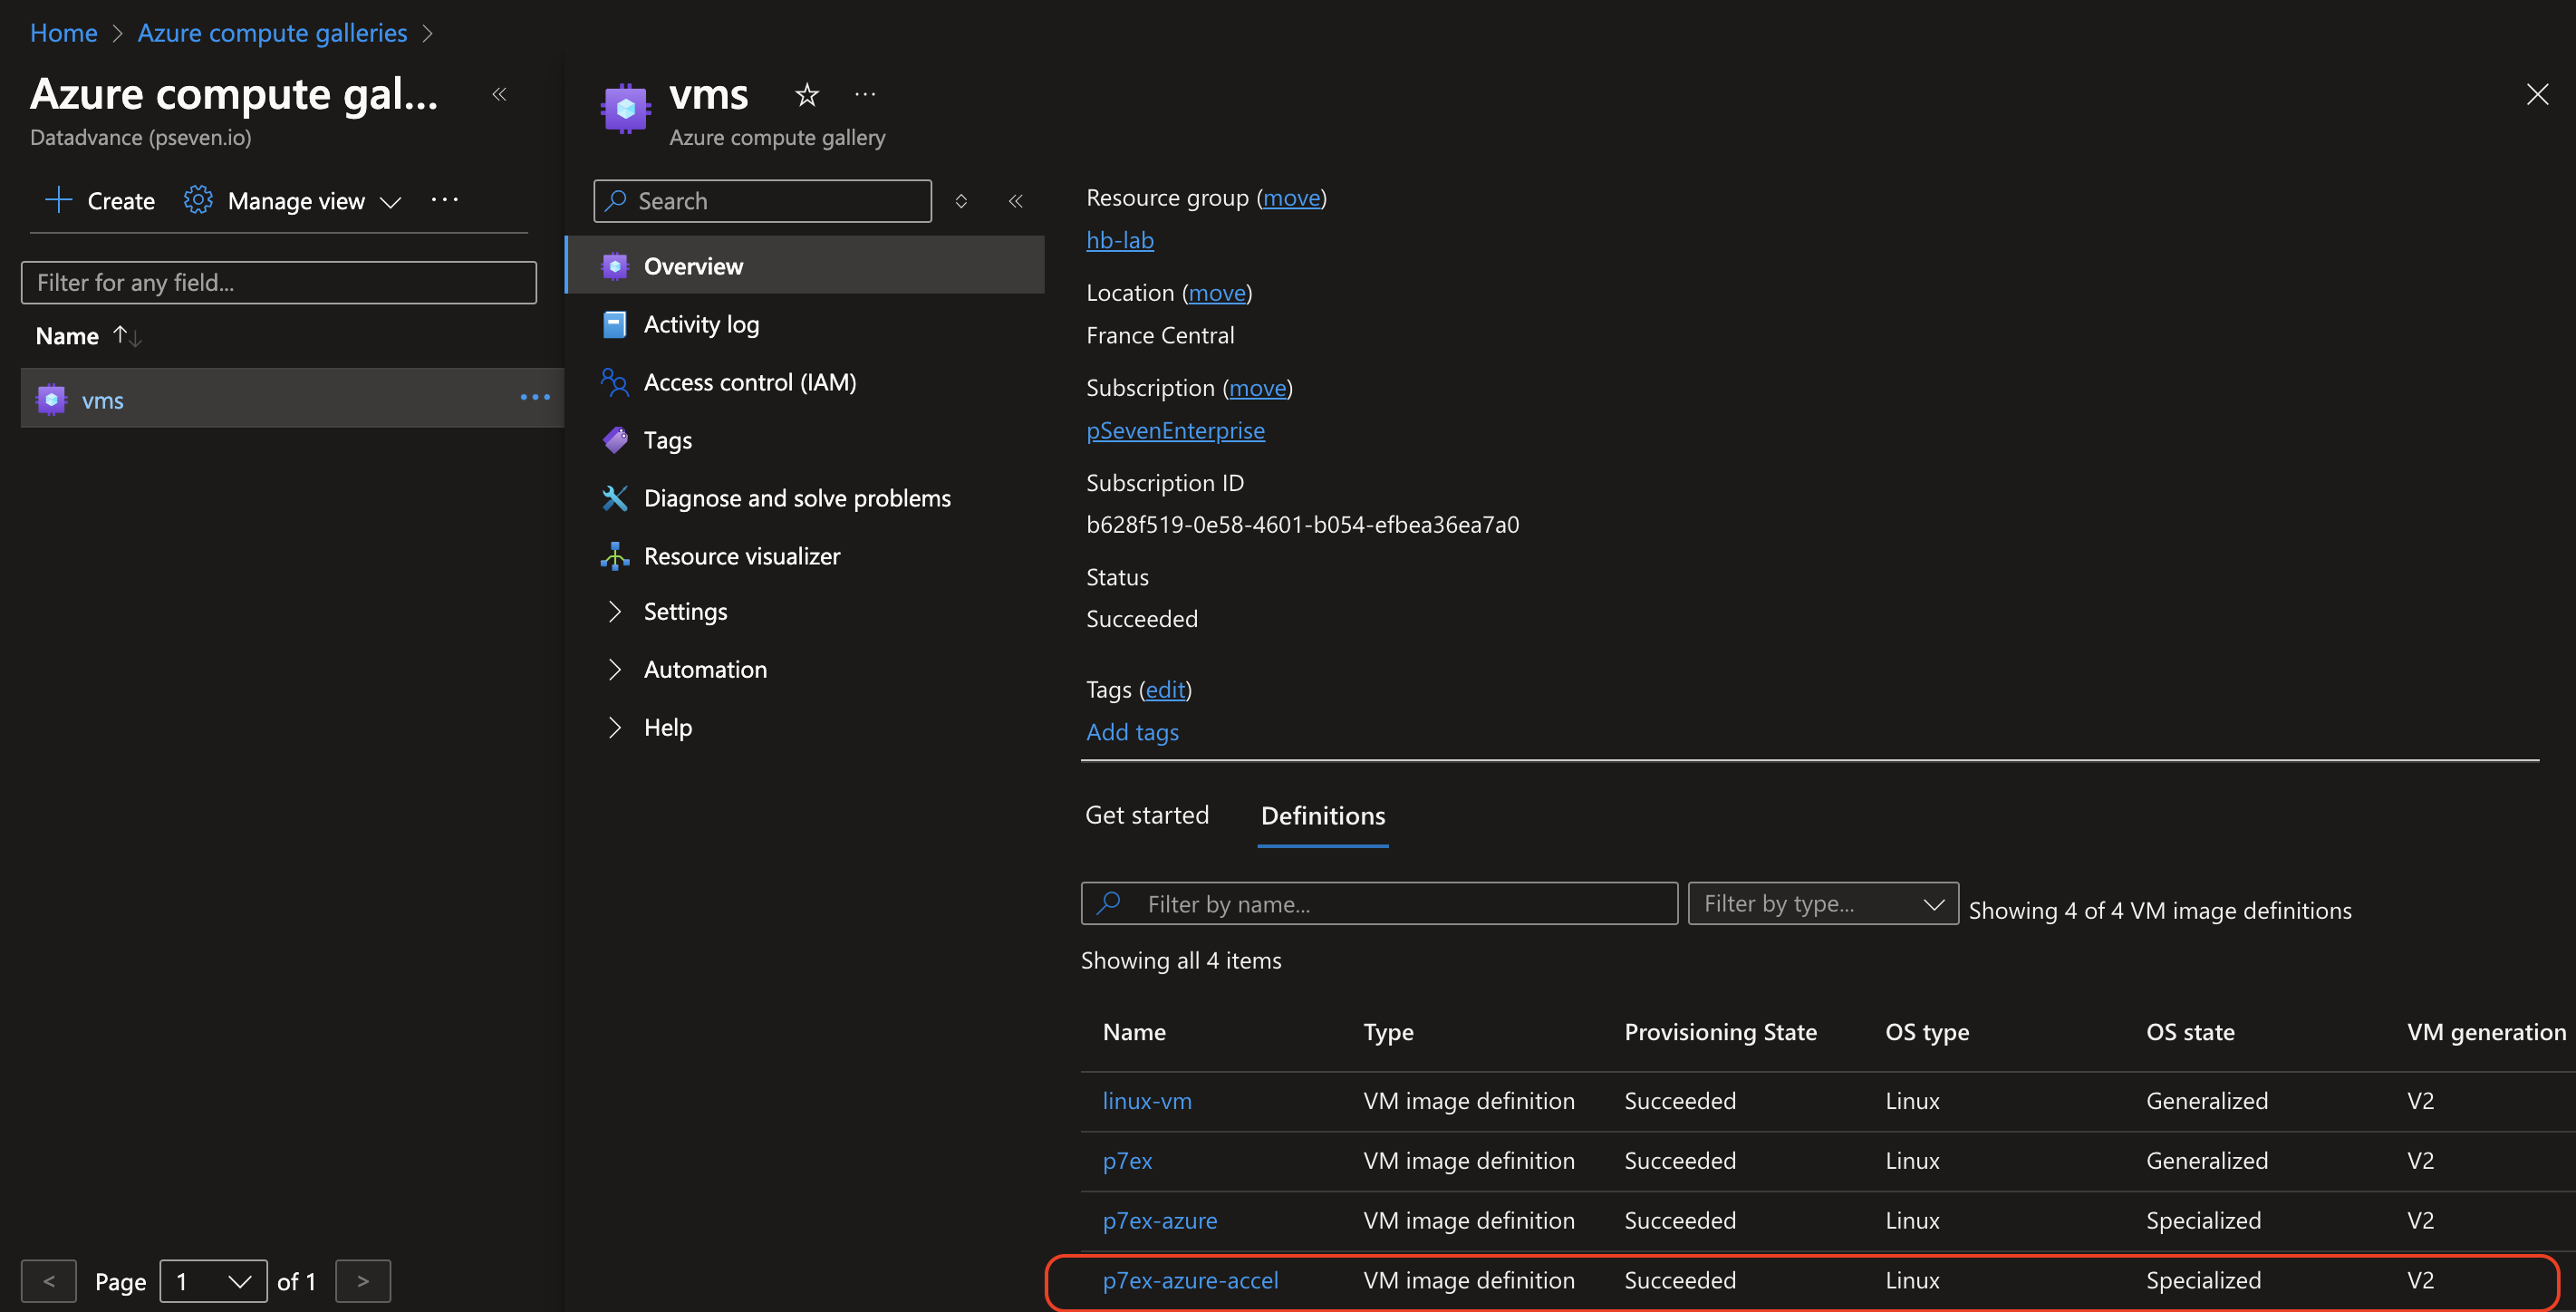
Azure - pSeven Enterprise Express VM image definition in Azure compute galleries -
Click the Create VM link to begin with the VM setup.
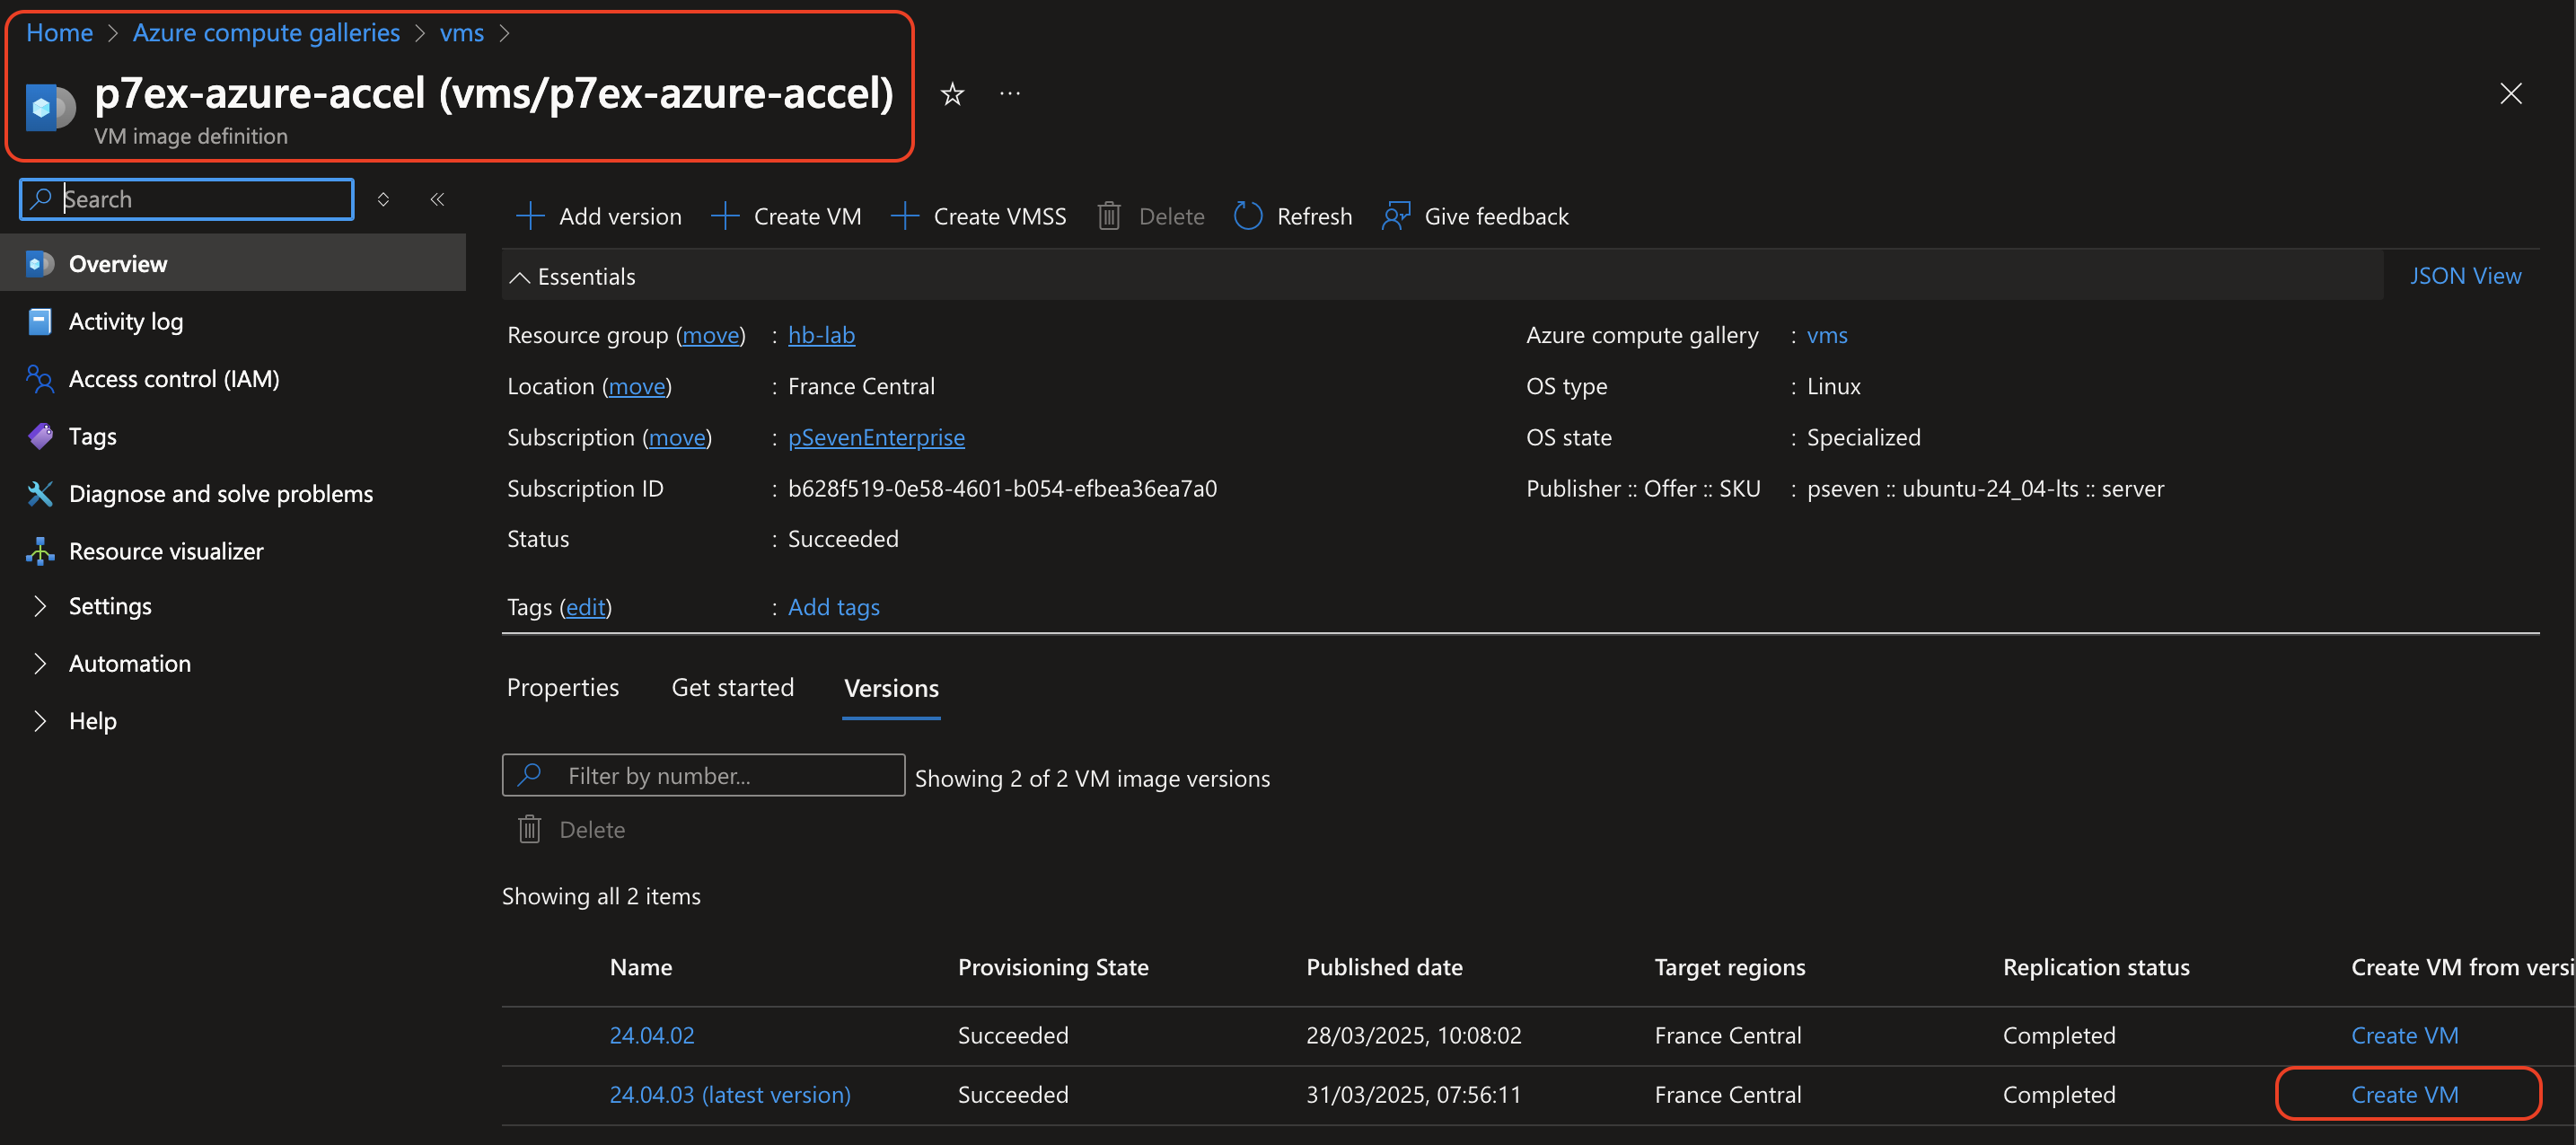
Azure - create a new VM in Azure compute galleries -
In the Basics tab, name the VM as you choose, then scroll down to the Size setting.
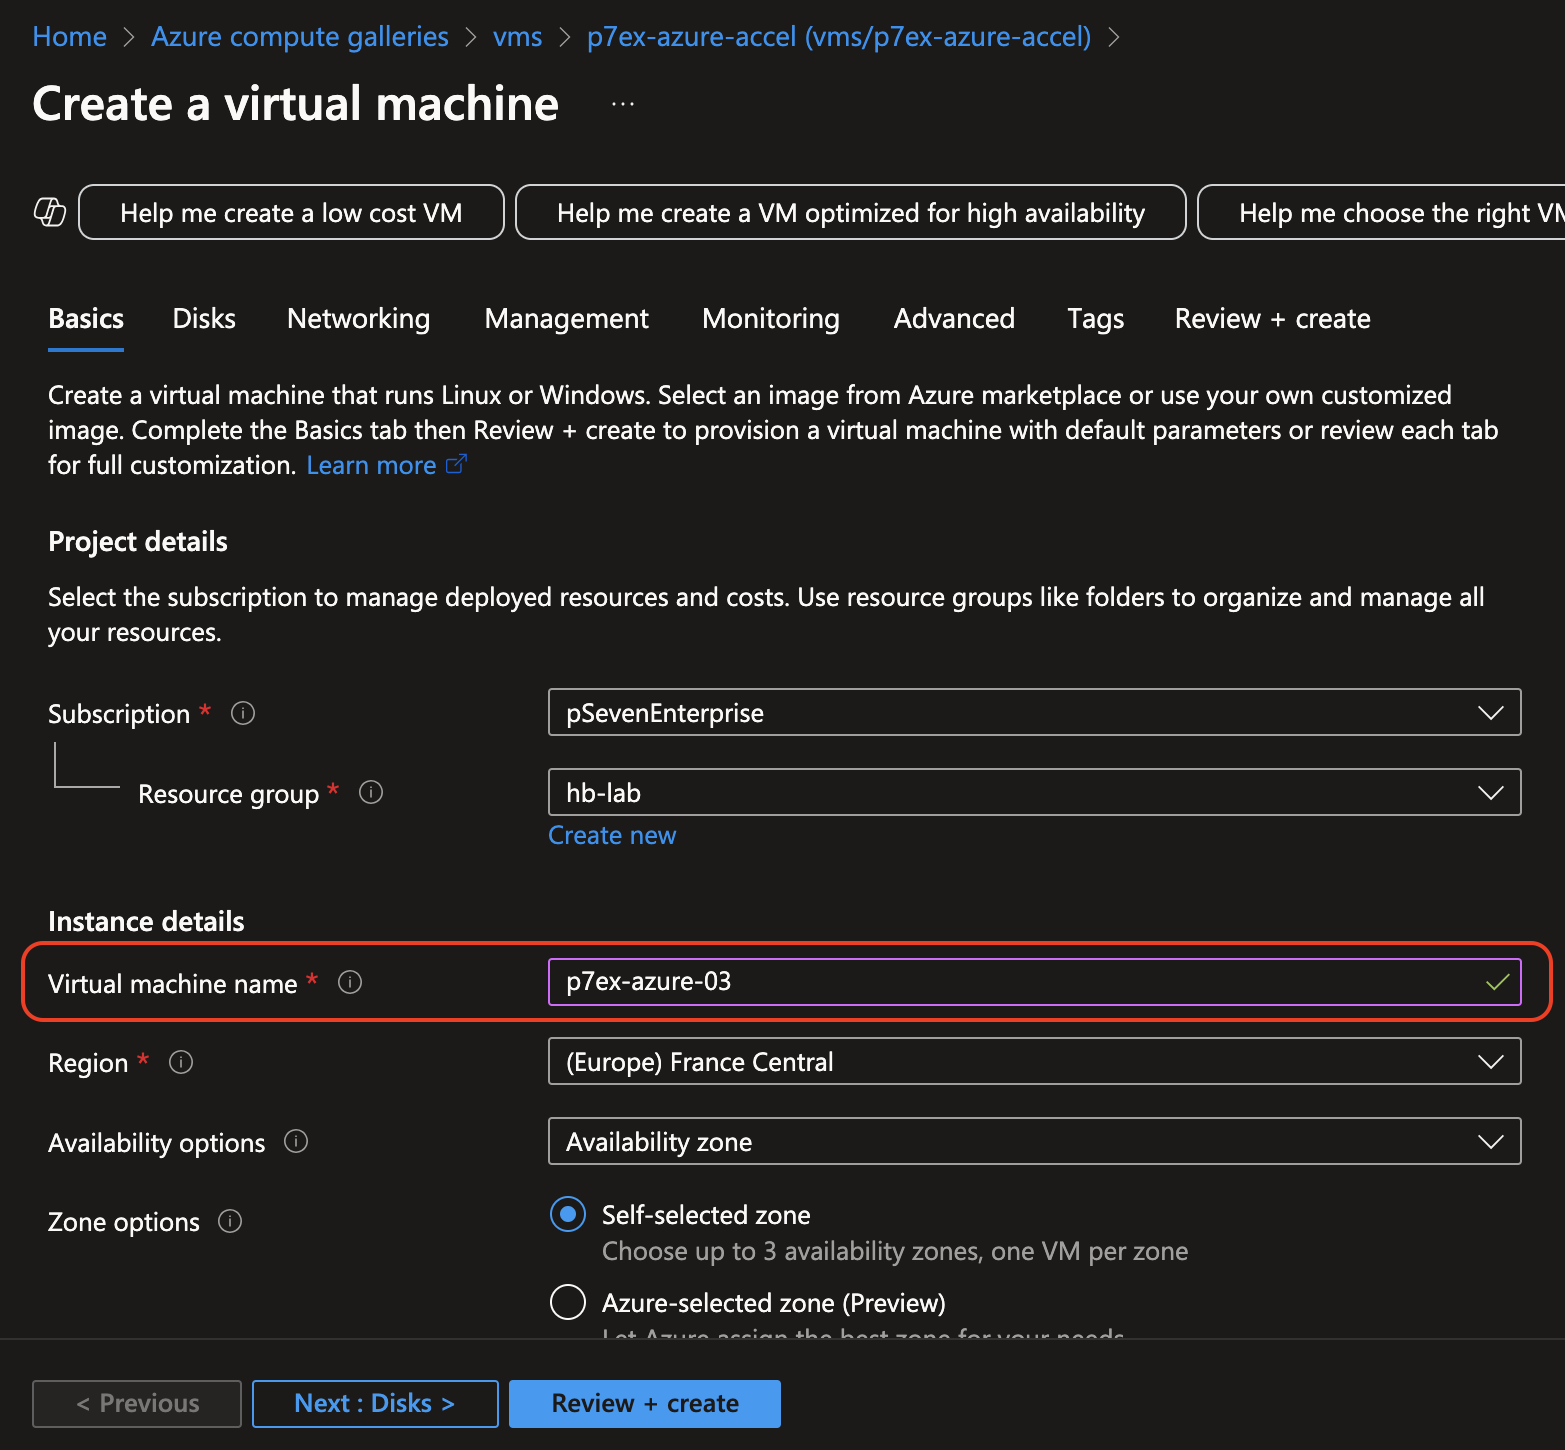
Azure - name the VM -
Select the instance size: "Standard_D16ds_v5" (16 vcpus, 64 GiB memory). Scroll the Basics tab down to Licensing.
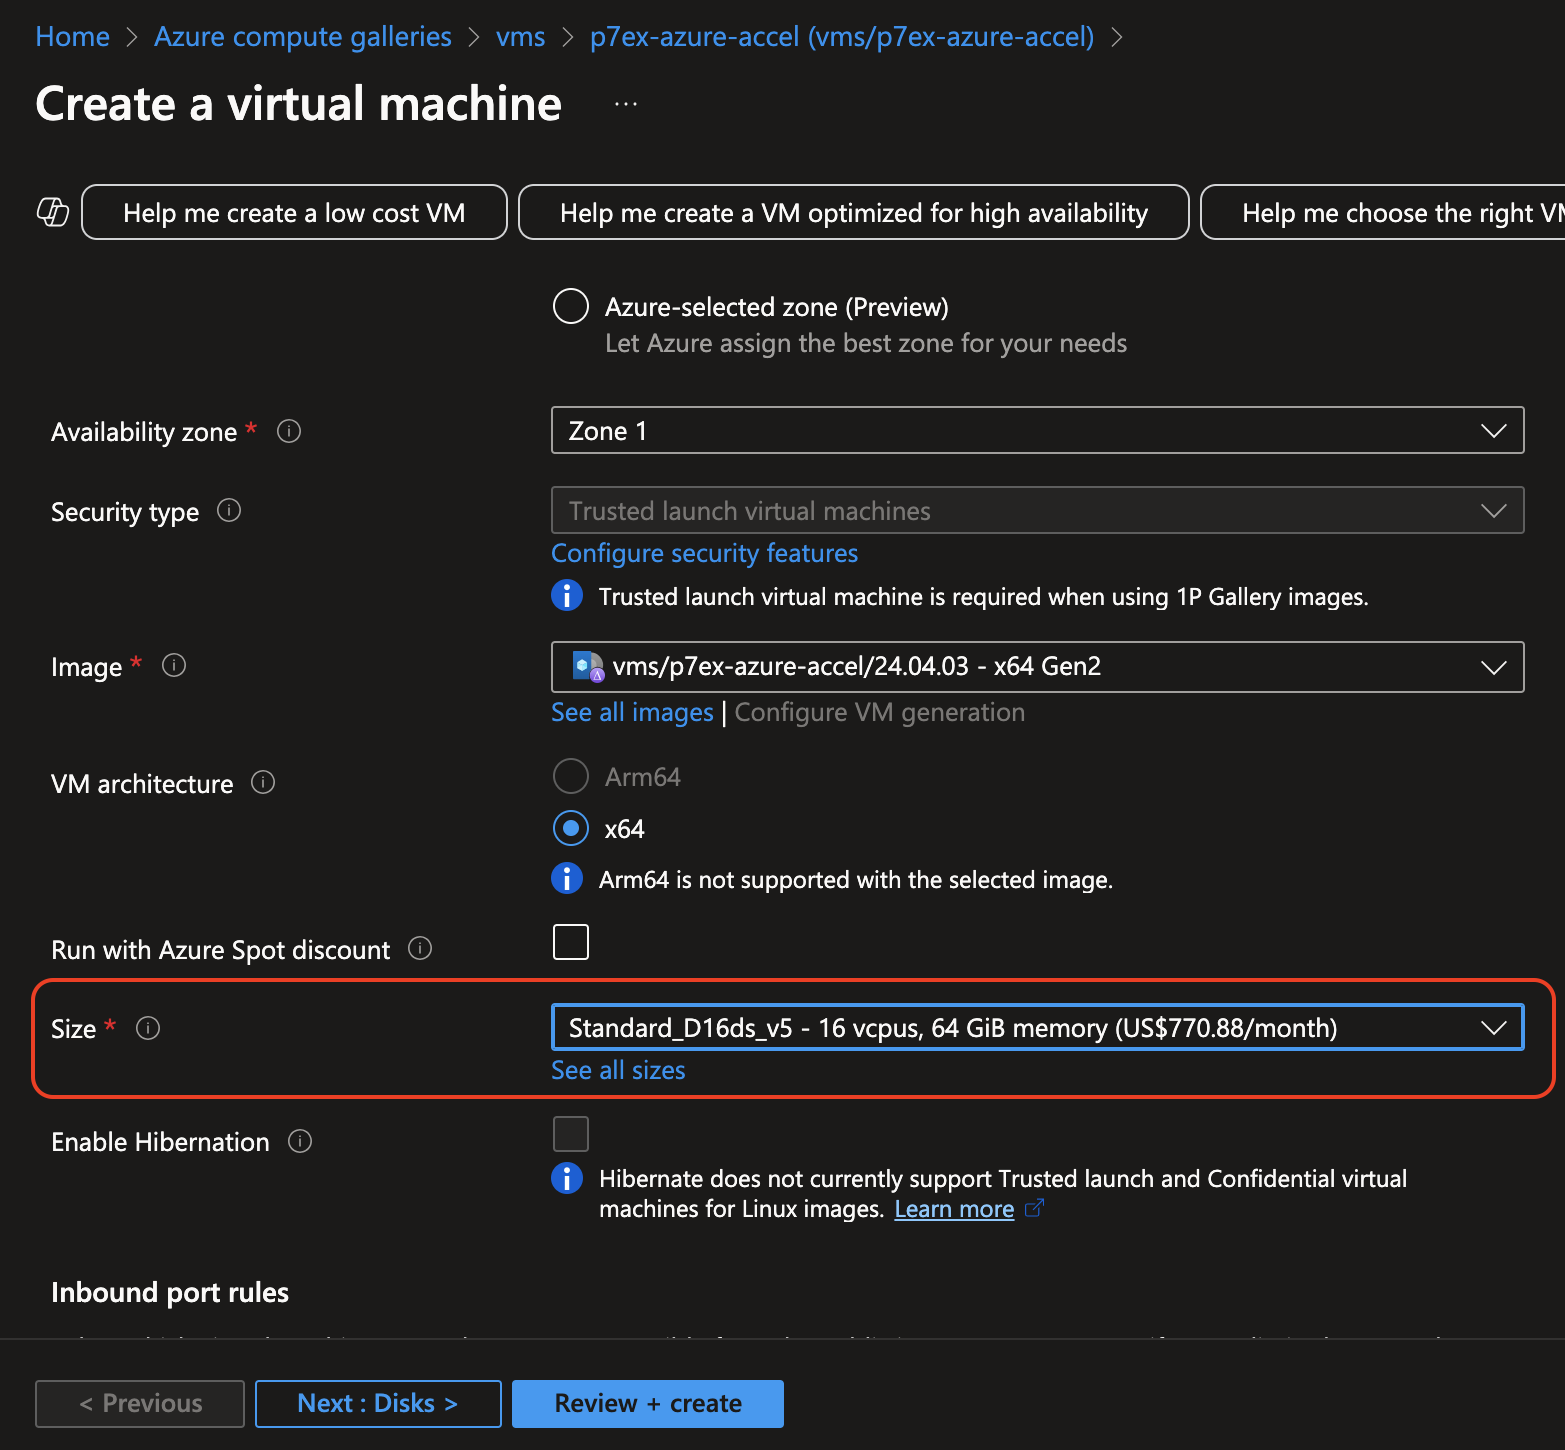
Azure - select the VM instance size: 16 vcpus, 64 GiB memory minimum -
In License type, select "Other".
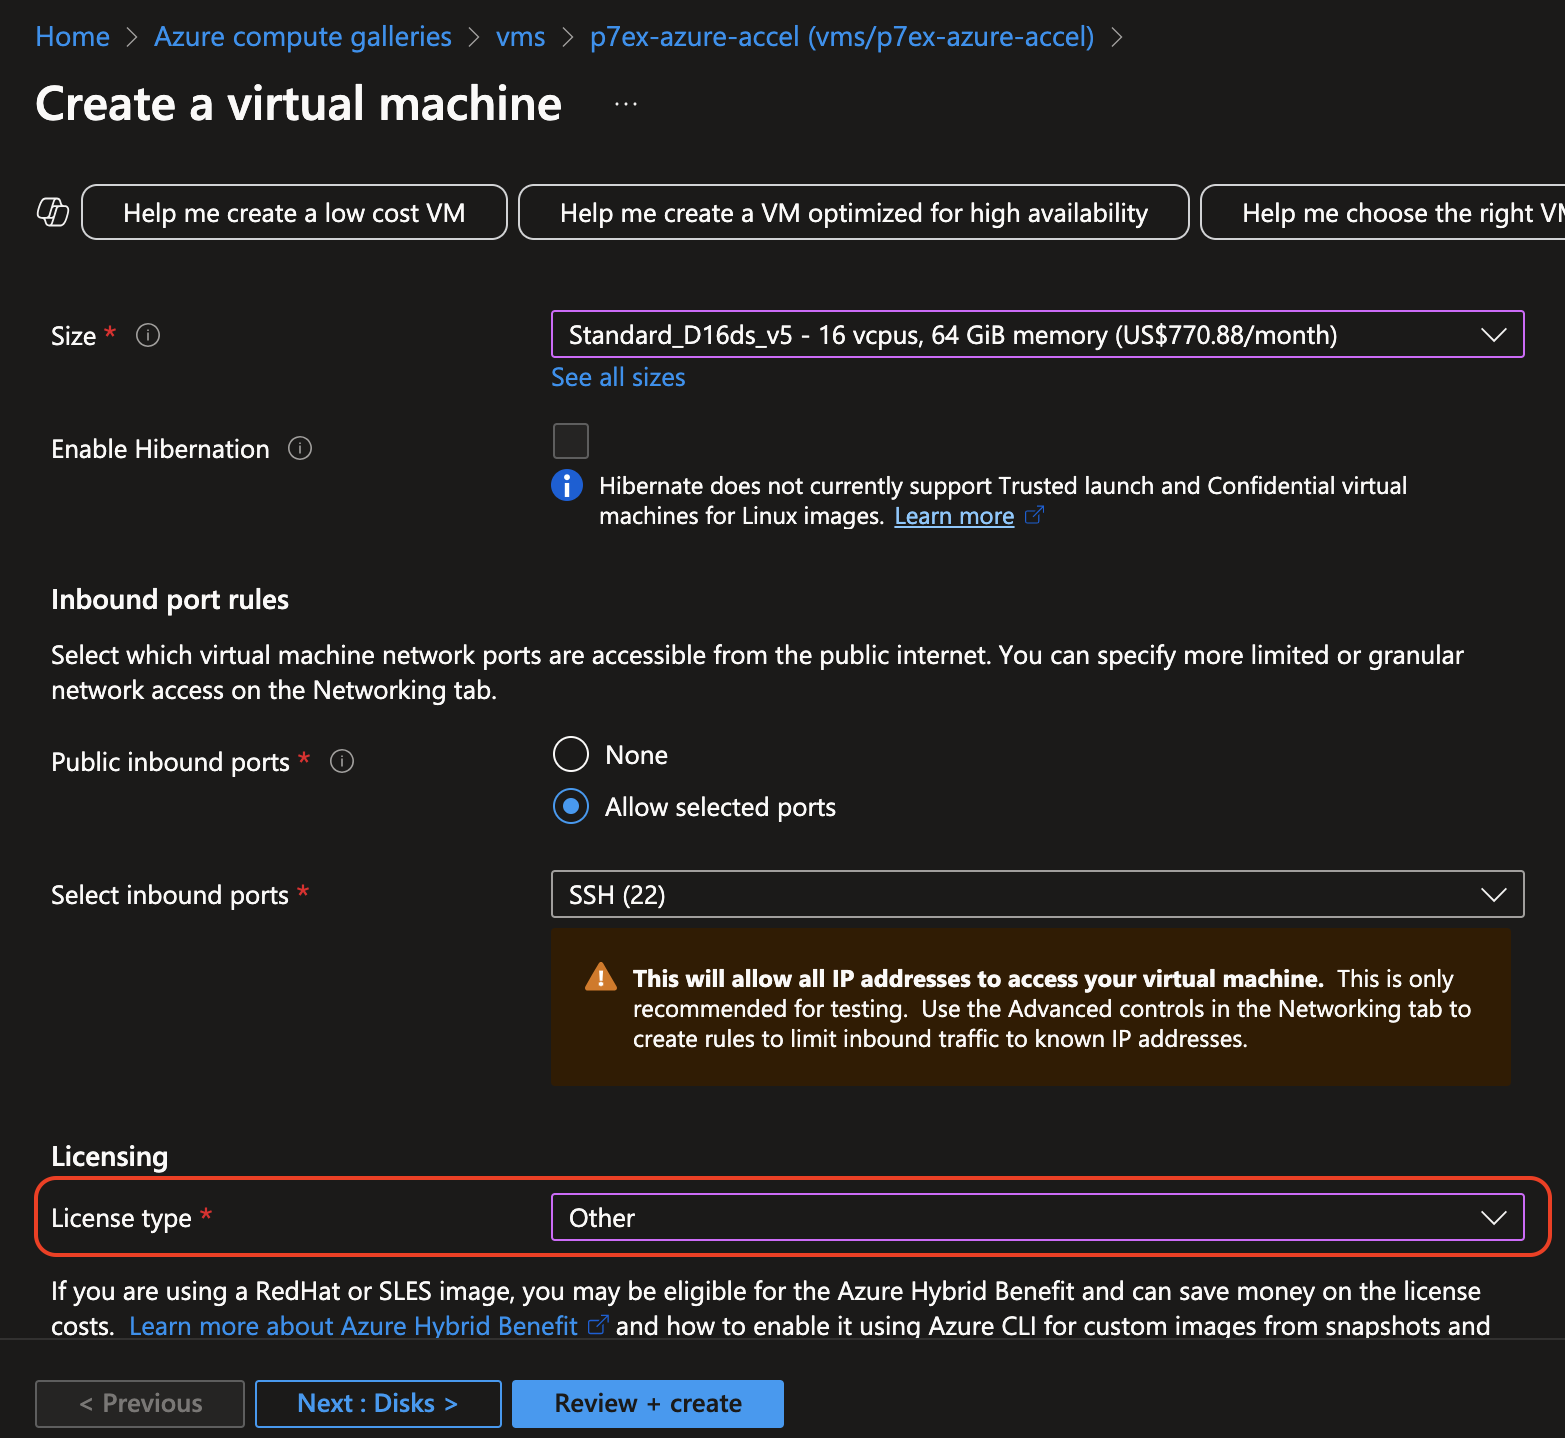
Azure - select license type: "Other" -
Next, go to the Disks tab. Click Create and attach a new disk to add a disk for the pSeven Enterprise Express data storage.
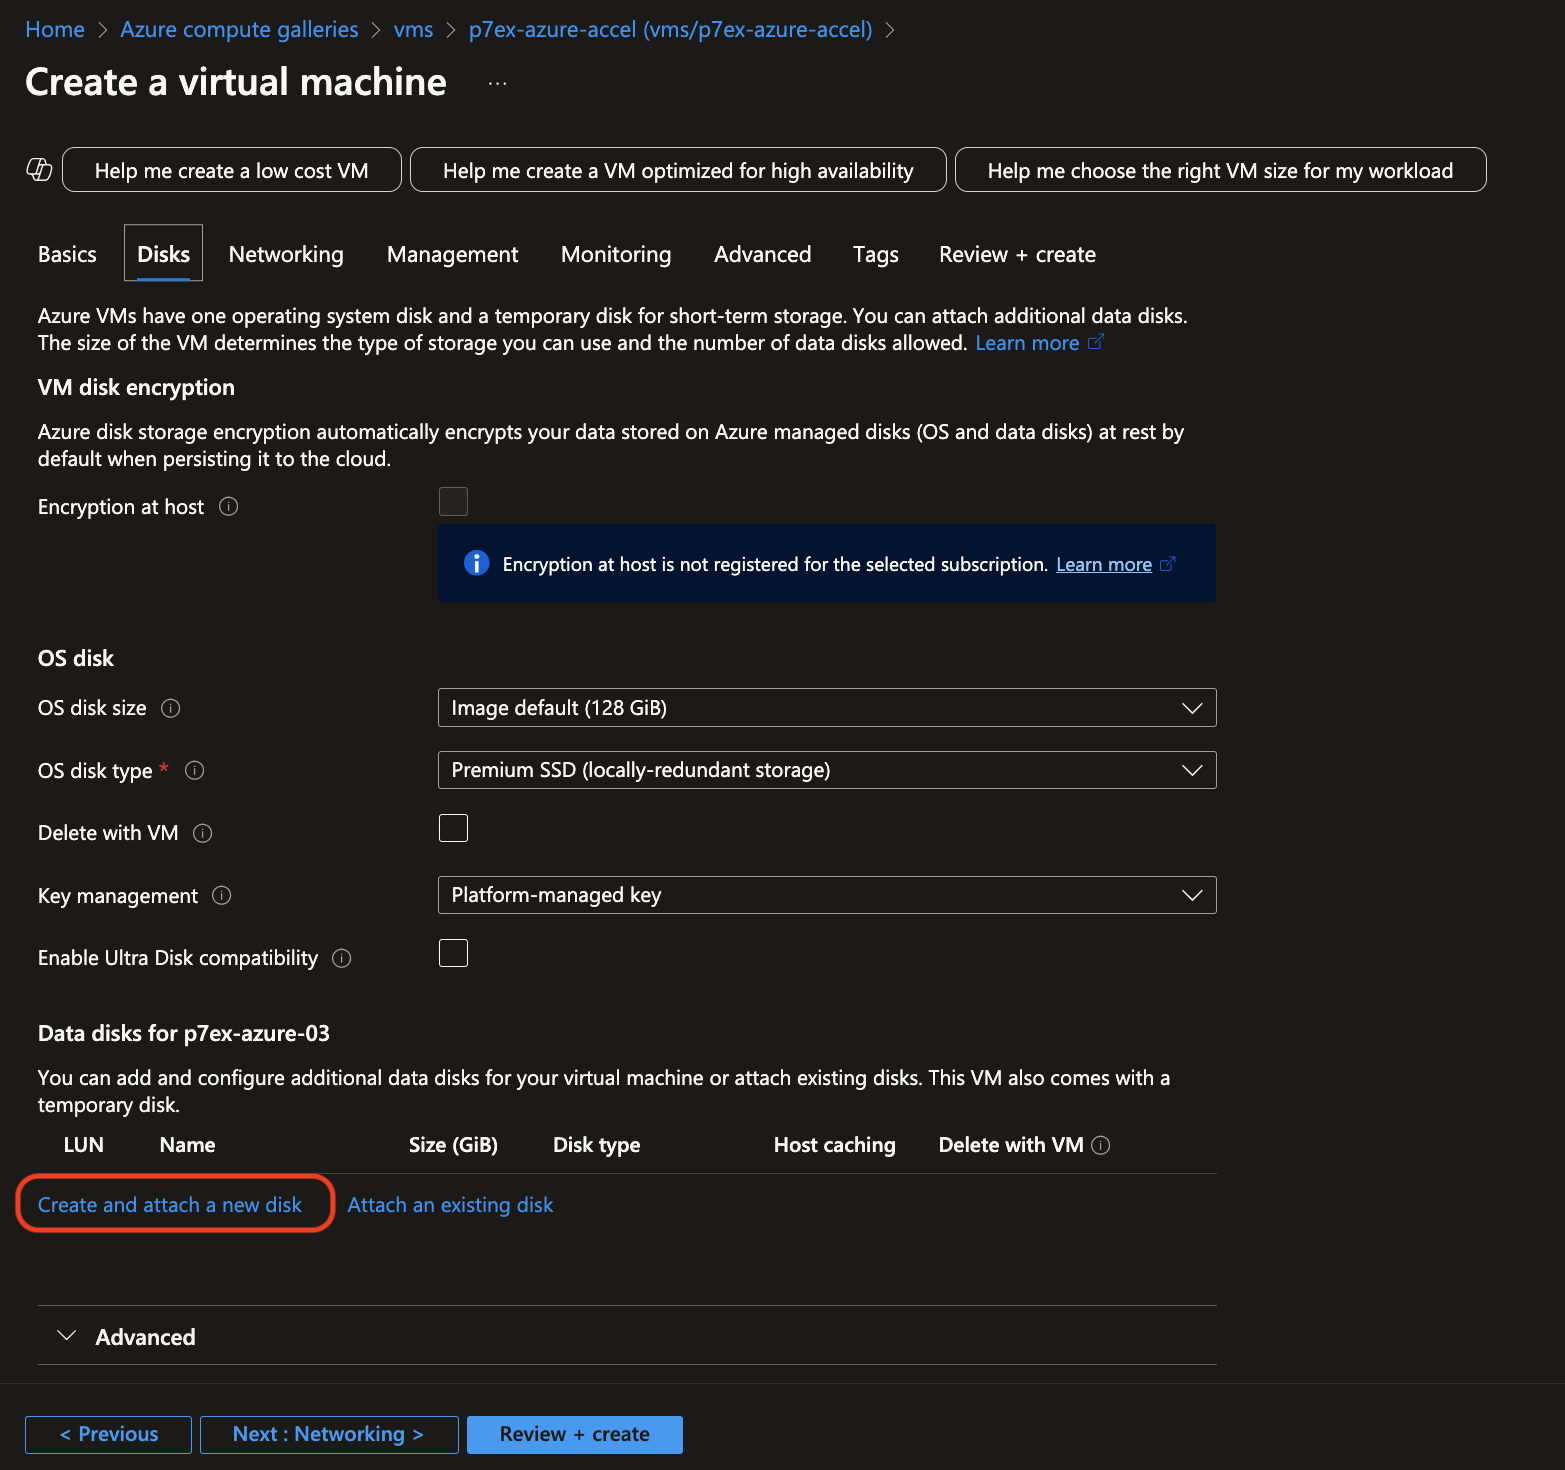
Azure - create and attach a new disk for data storage -
In the disk settings, select Size: 1024 GiB (P30 performance tier), Premium SSD LRS.

Azure - select the data storage disk size: 1024 GiB (P30 tier) -
Confirm your disk settings.
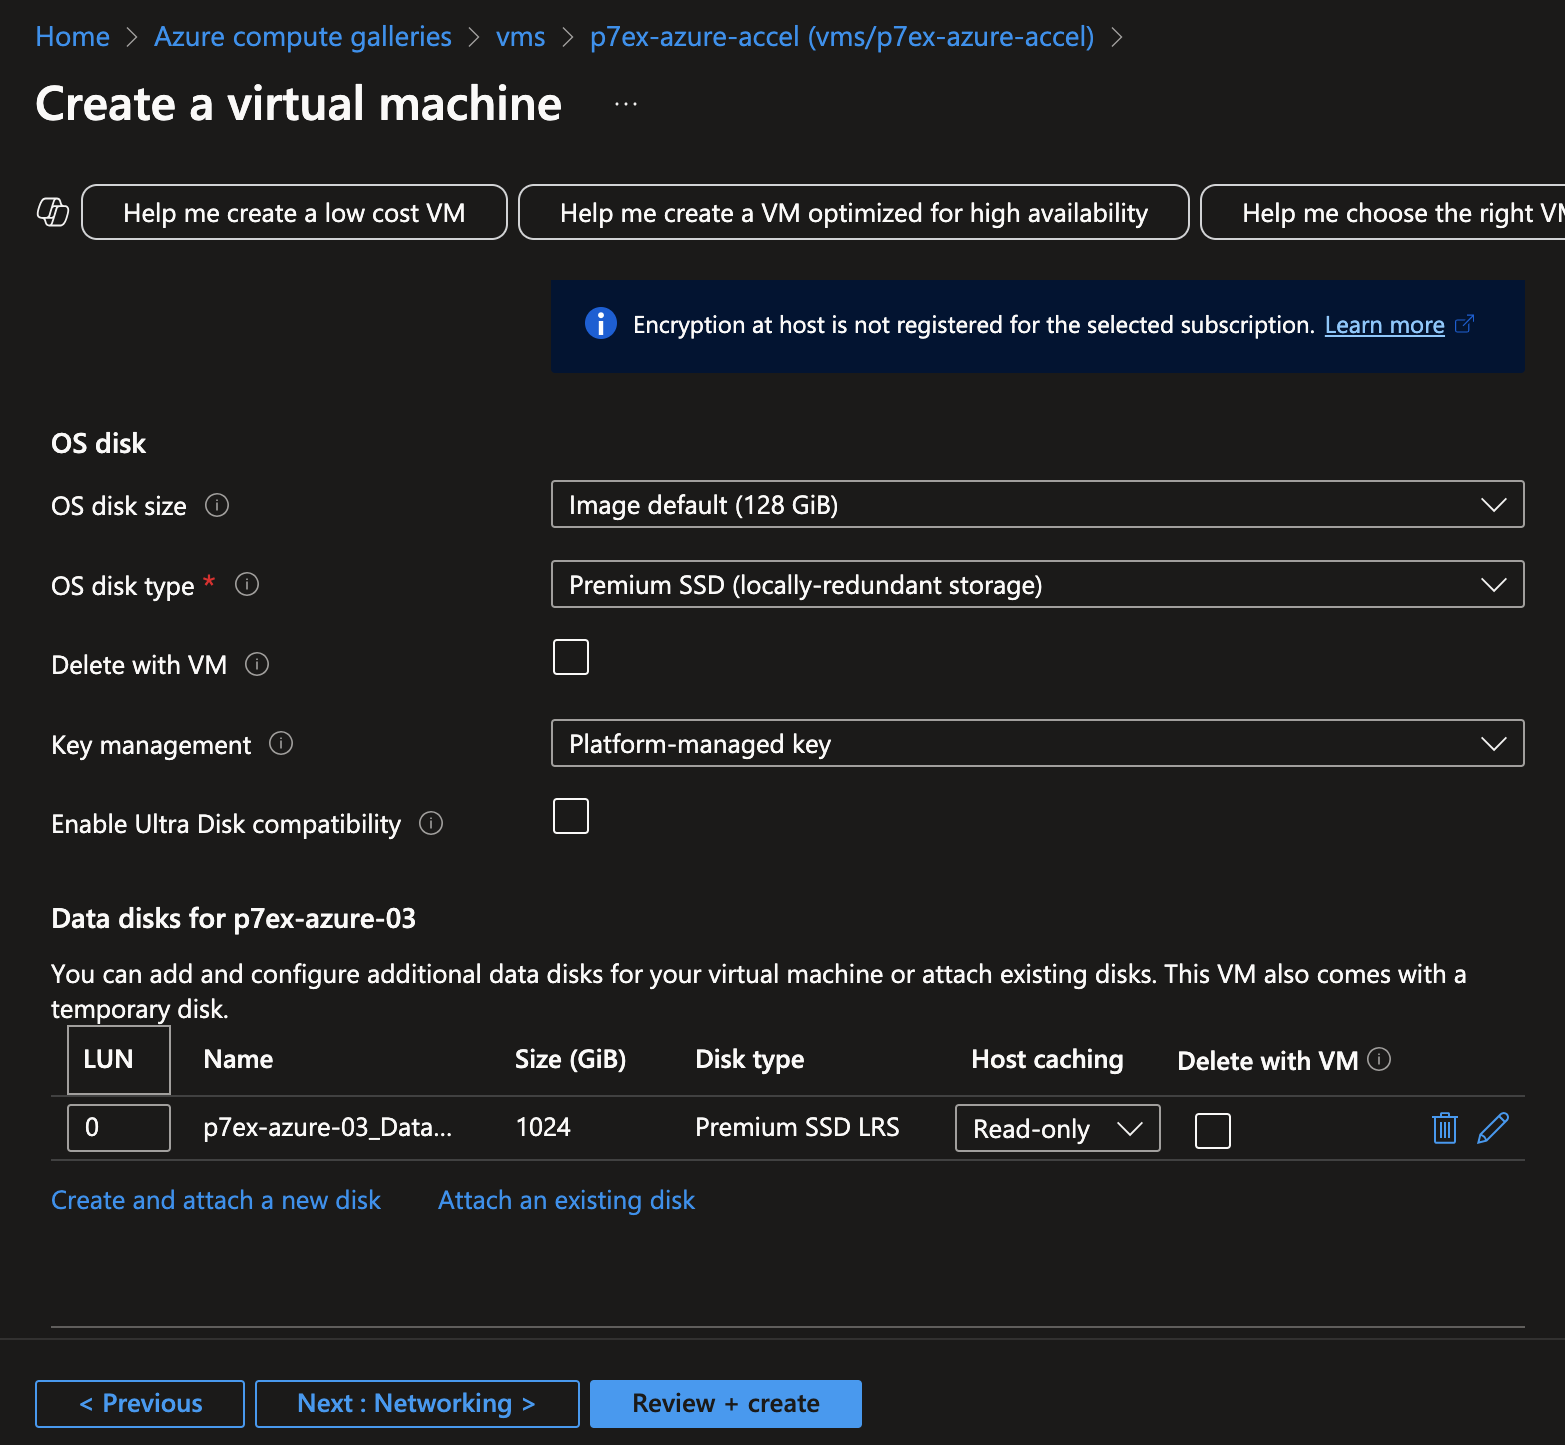
Azure - VM disk settings -
Set up a network security group for pSeven Enterprise Express. Allow these inbound connections:
- SSH 22/tcp - from the admin IPs only
- HTTP 4444/tcp - from the admin IPs only (deployment logs)
- HTTP 80/tcp - from the user and admin IPs (pSeven Enterprise)
- HTTP 5000/tcp - from the admin and developer IPs (developer Registry access)
- OpenVPN 31194/udp - from the extension node IPs only
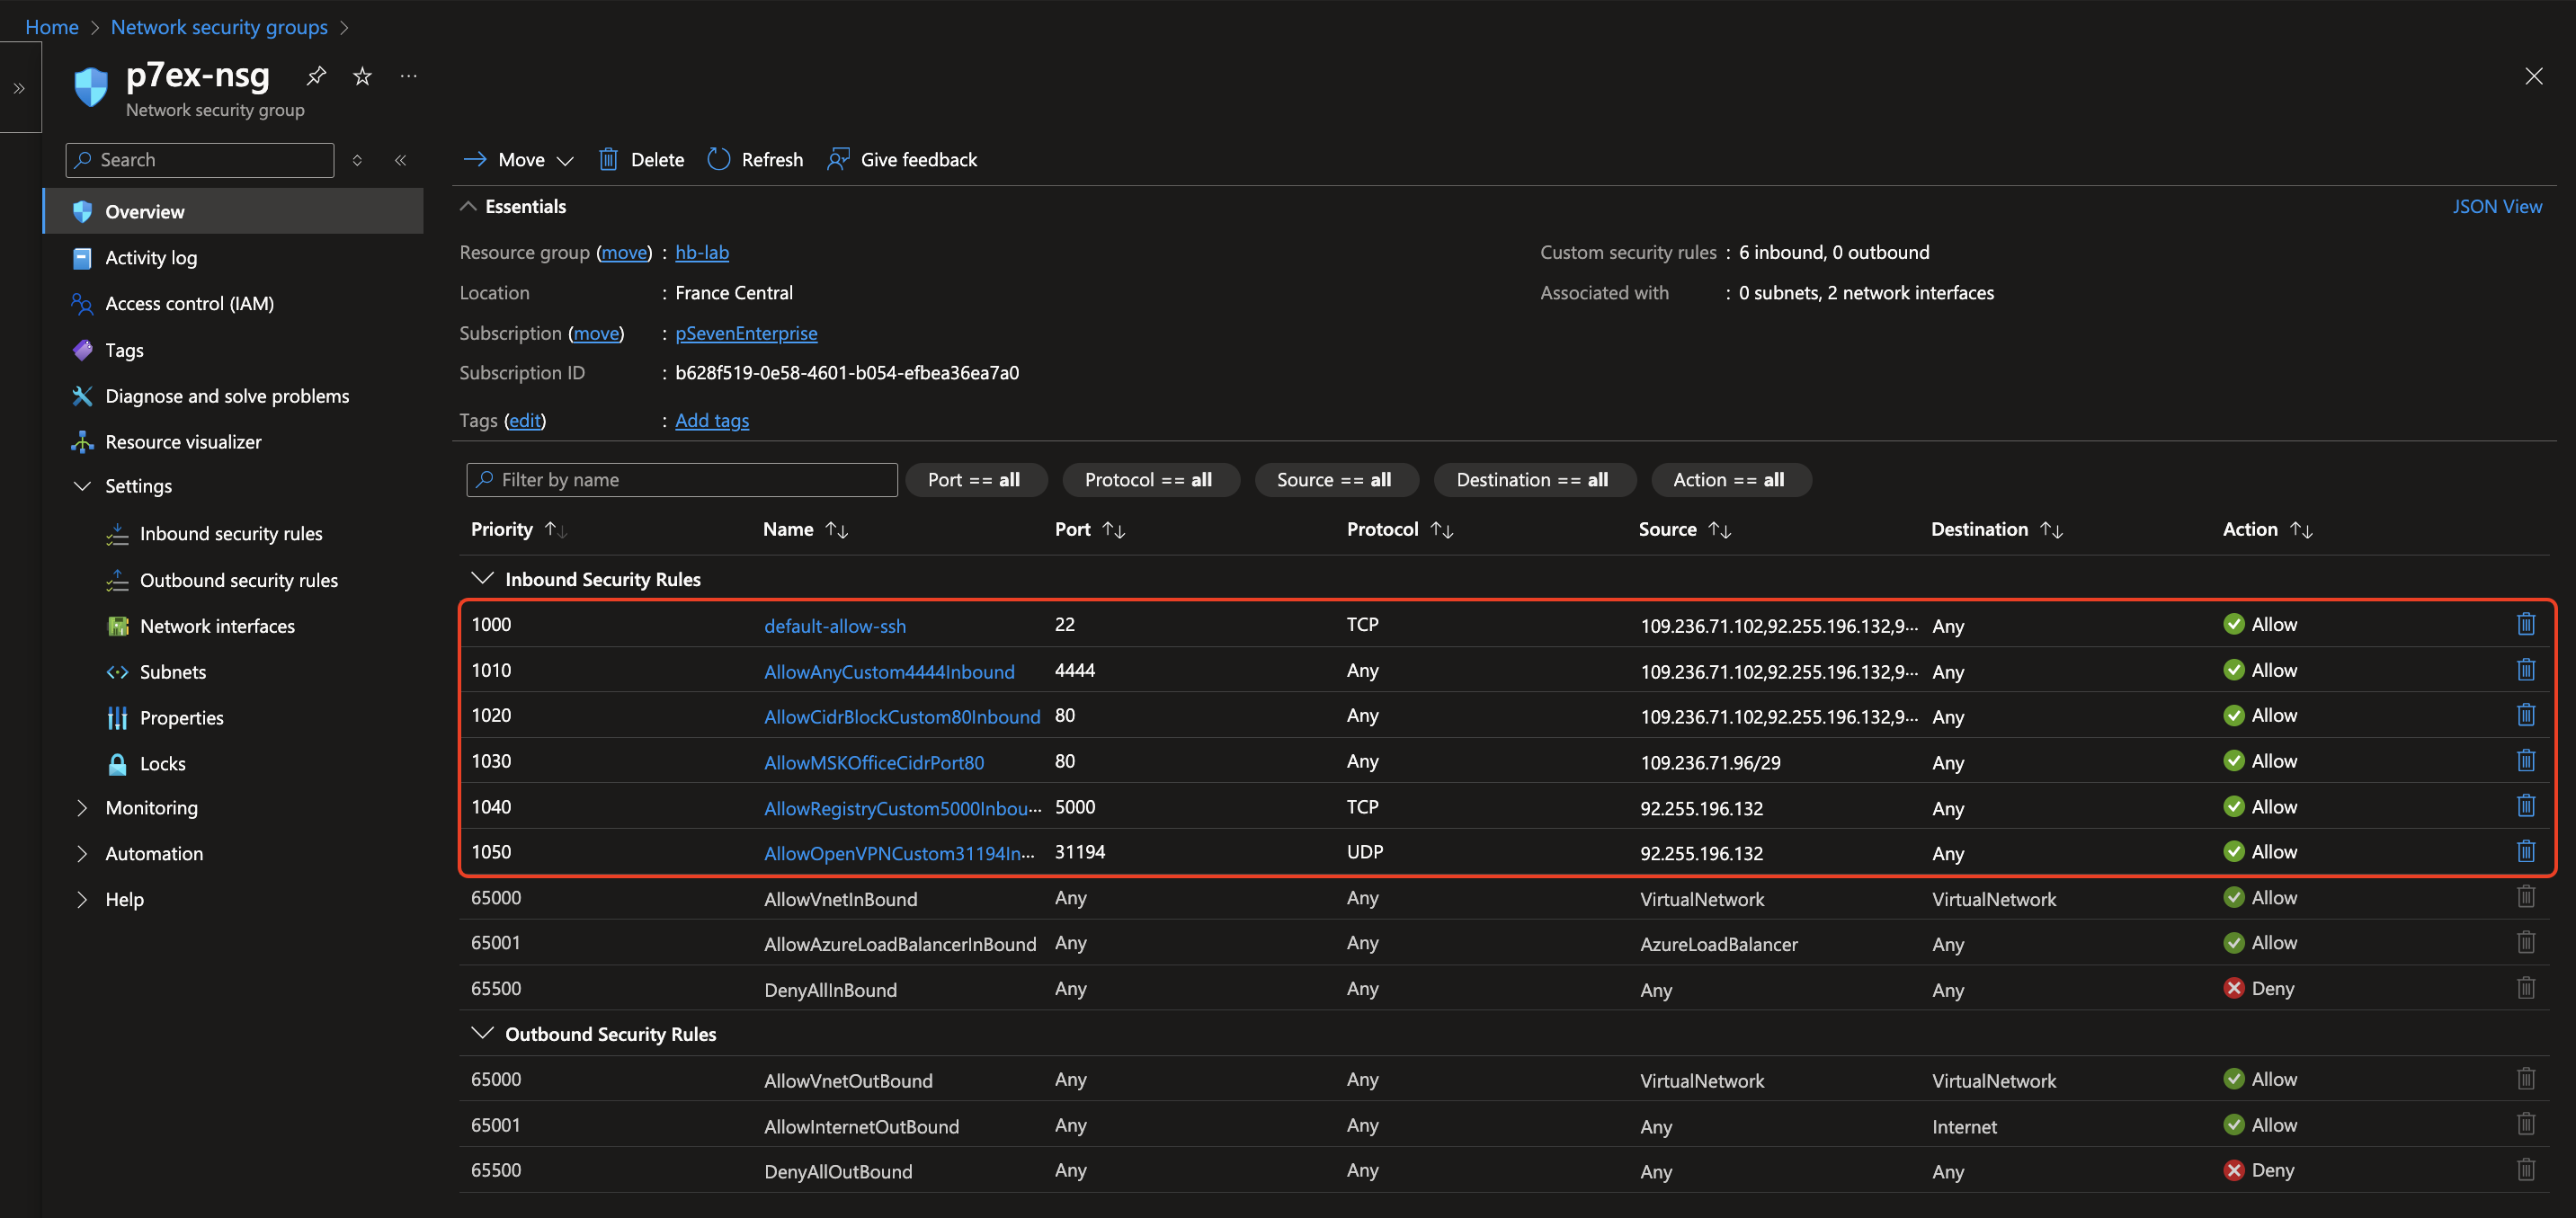
Azure - network rules: allow inbound 22/tcp, 4444/tcp, 80/tcp, 5000/tcp, 31194/udp -
Go to the Networking tab and select:
- NIC network security group: "Advanced"
- Configure network security group: select the group you've set up for pSeven Enterprise Express.
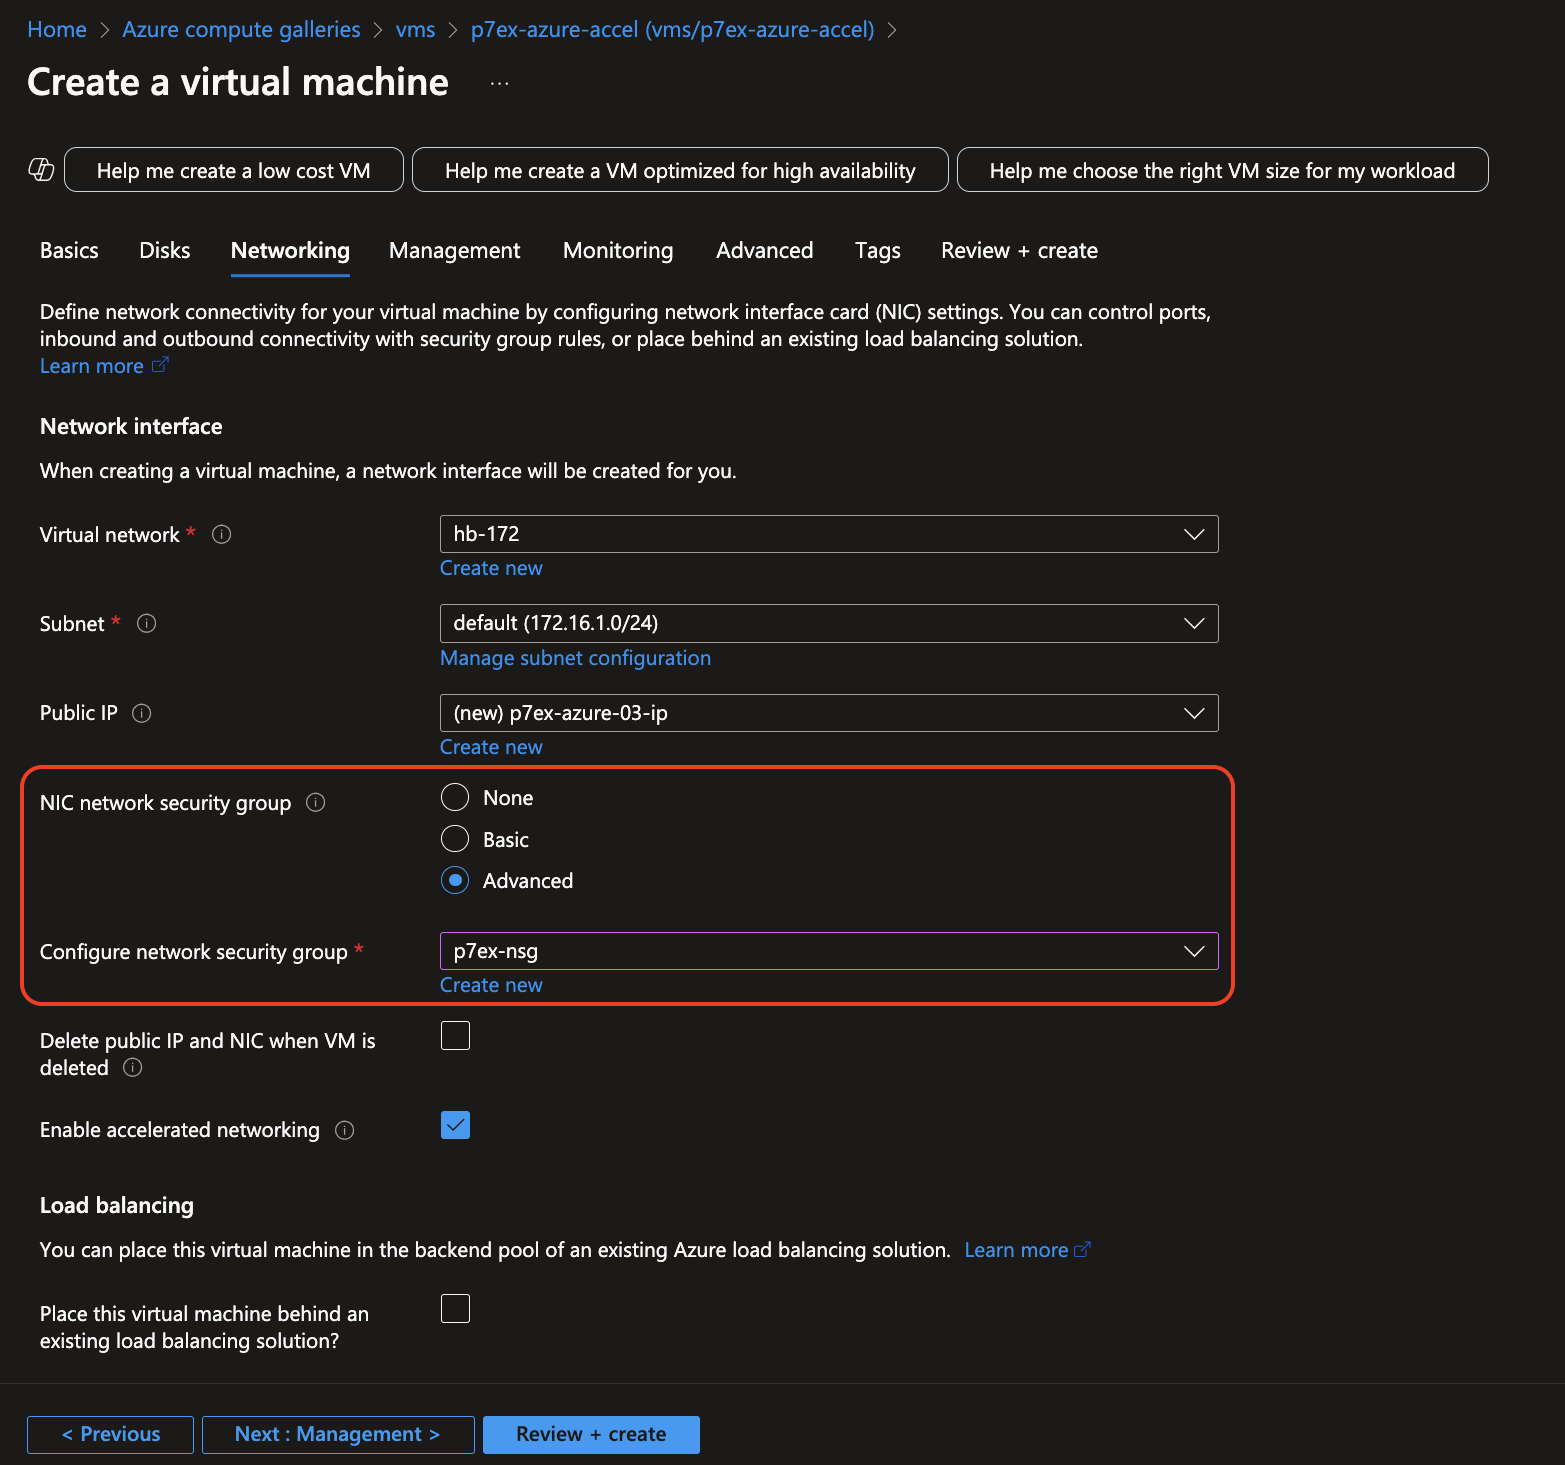
Azure - networking settings: select the security group -
In the Management, Monitoring, Advanced, and Tags tabs, you can leave the default settings unchanged.
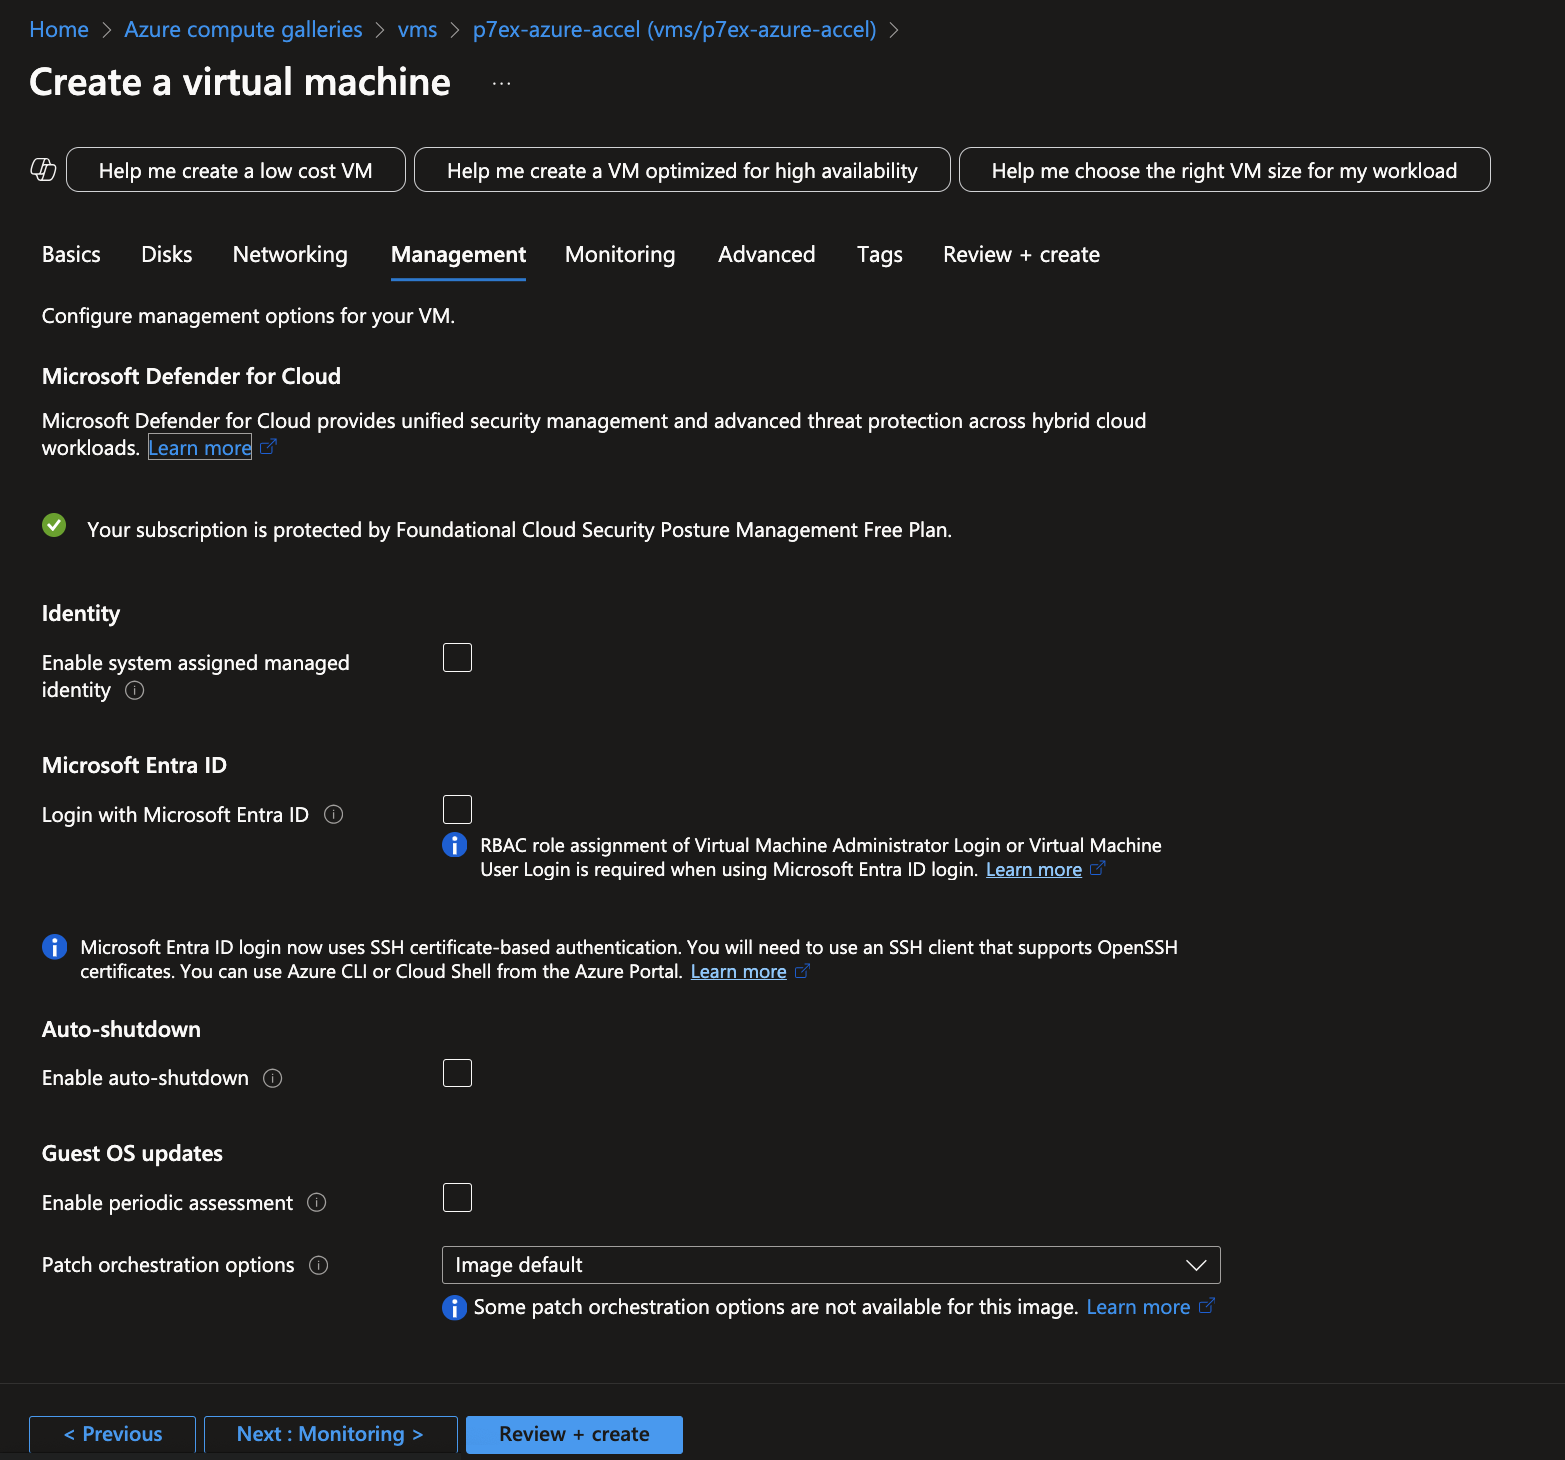
Azure - management settings: accept defaults 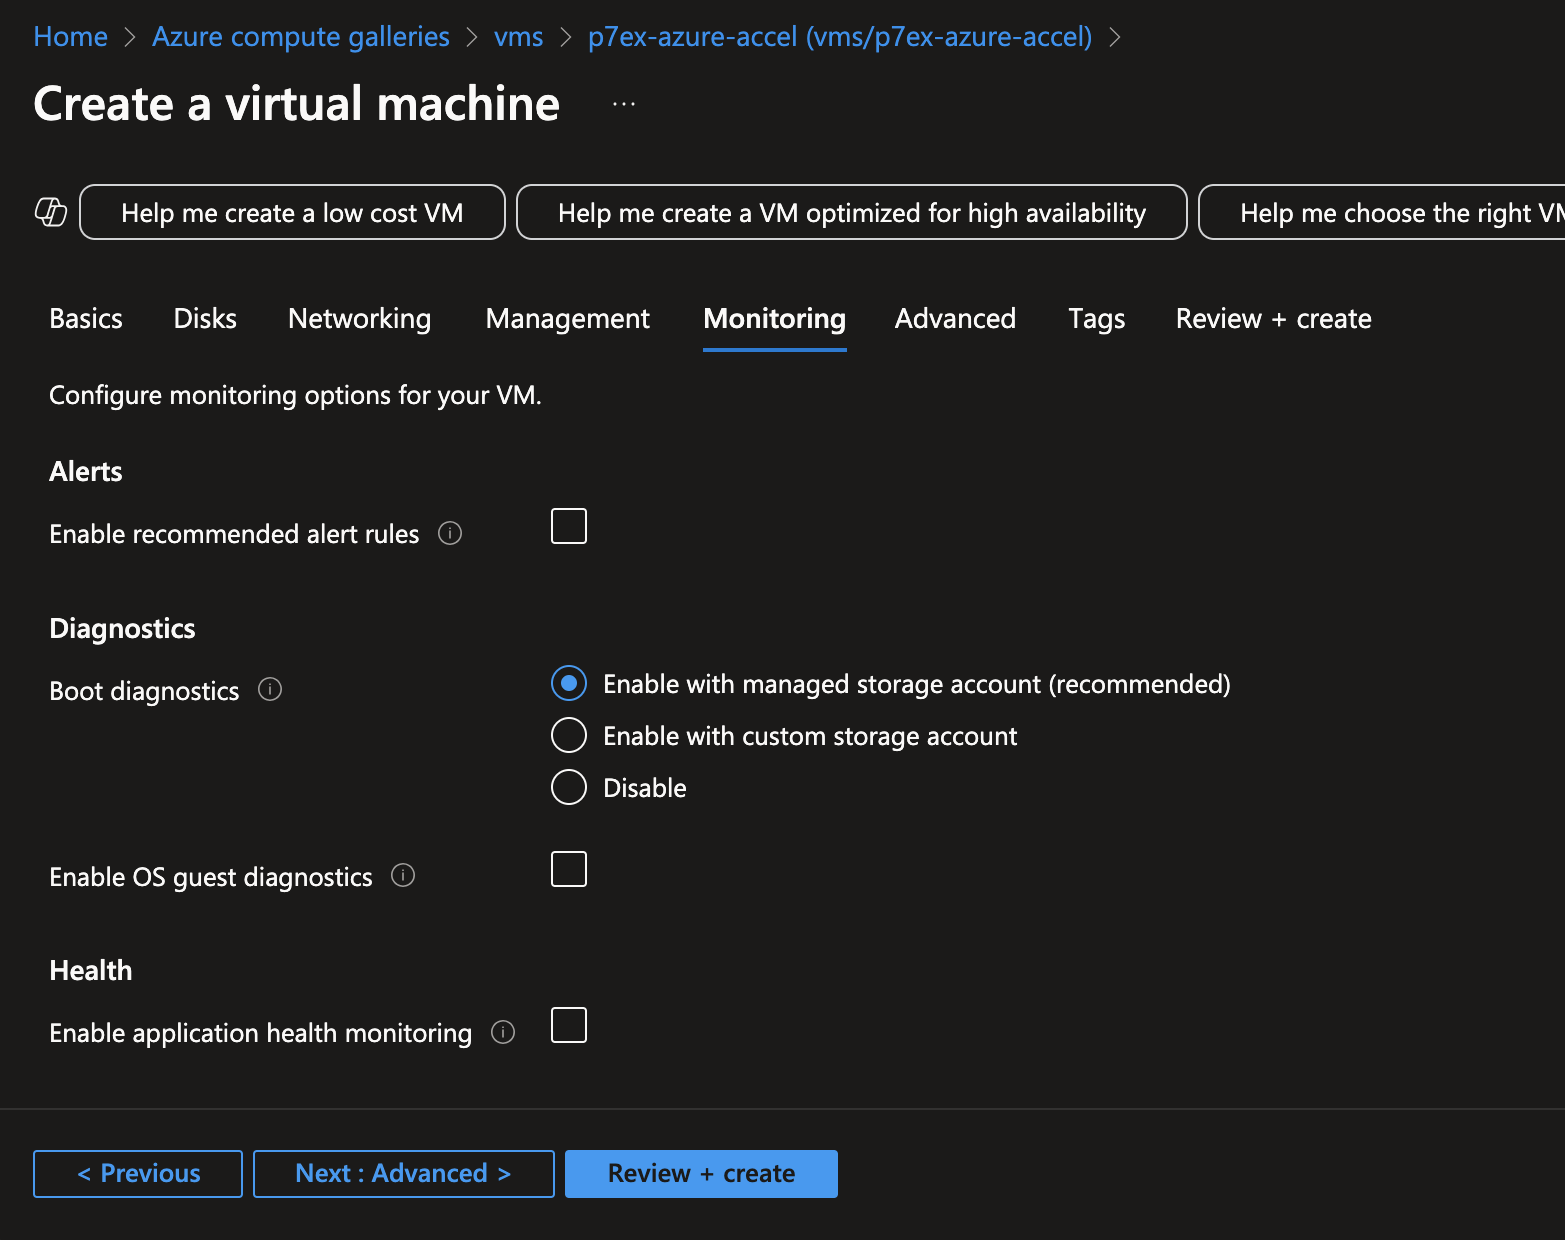
Azure - monitoring settings: accept defaults 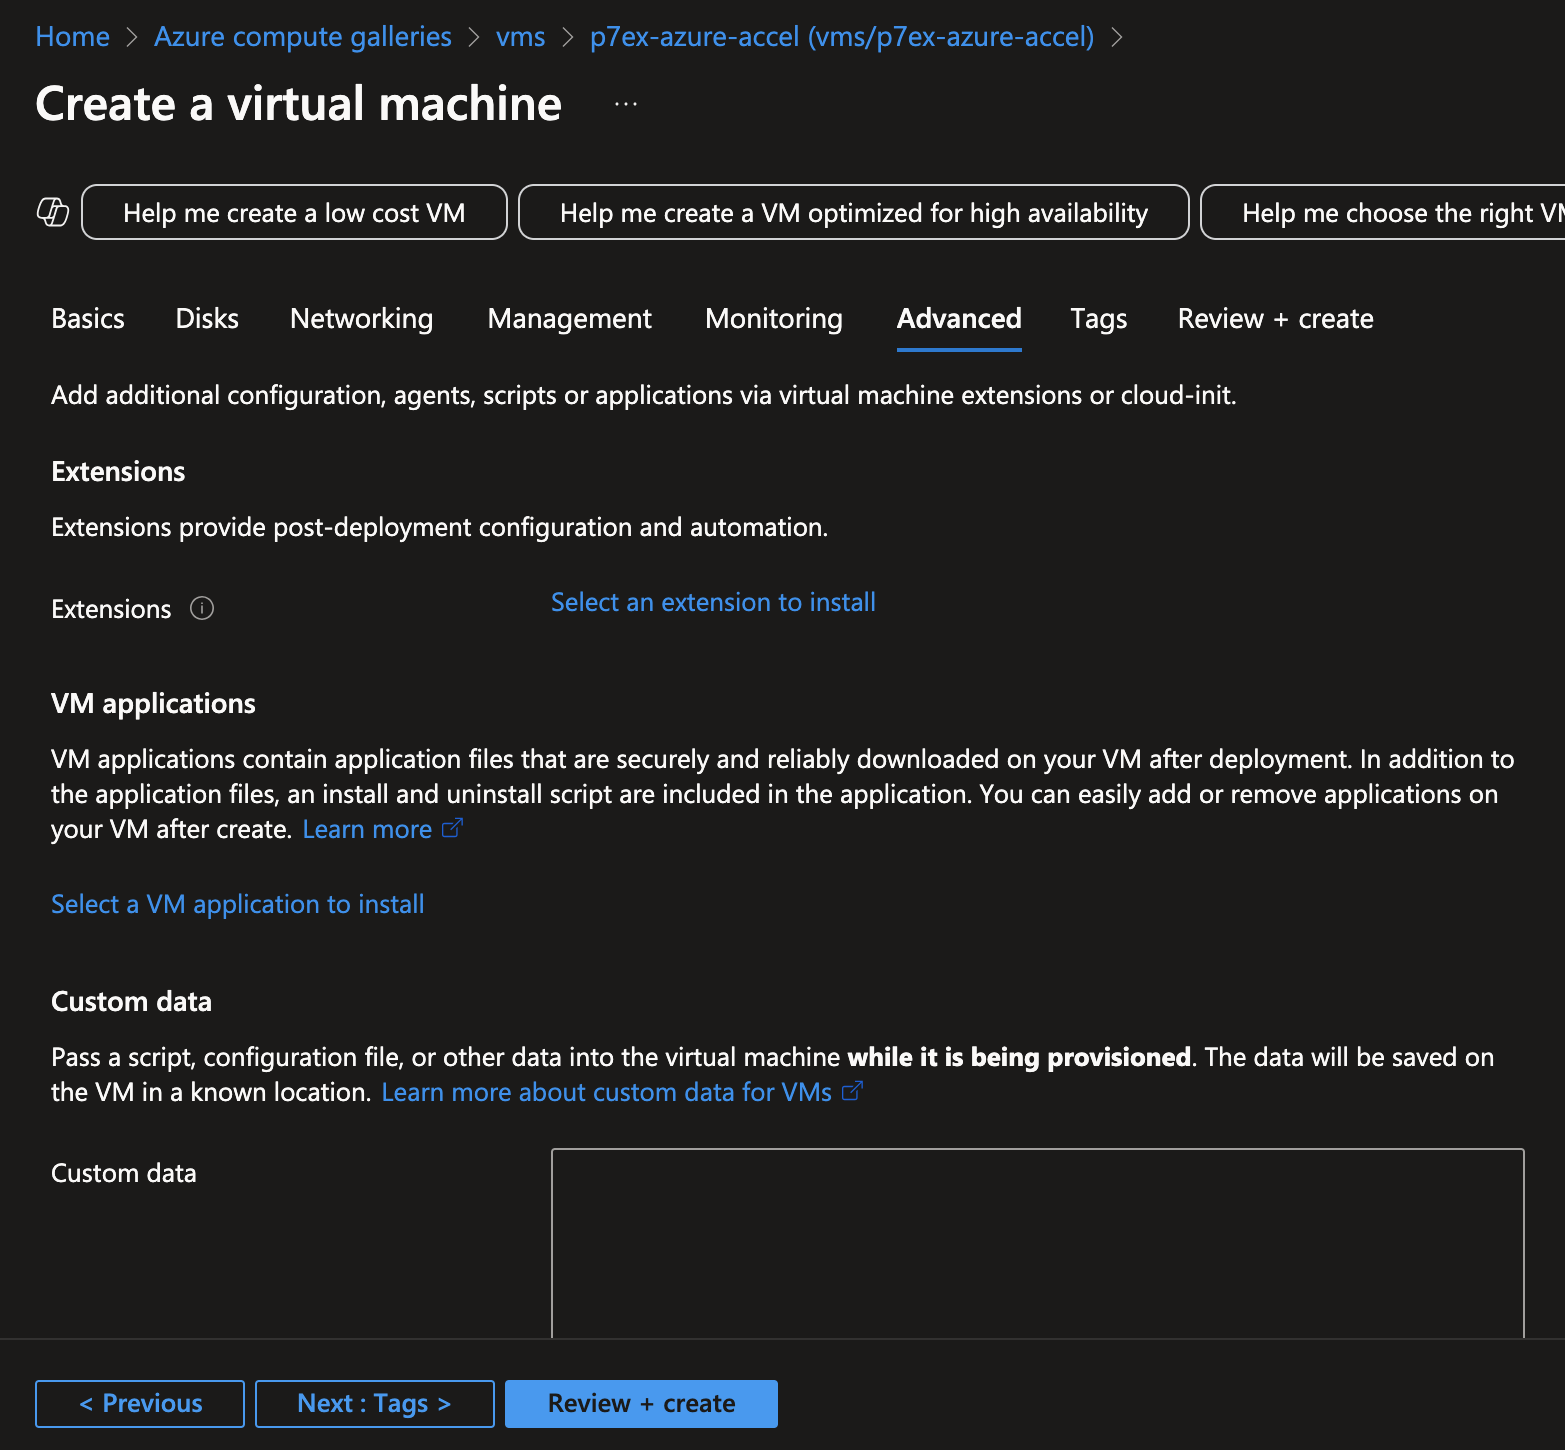
Azure - advanced settings: accept defaults 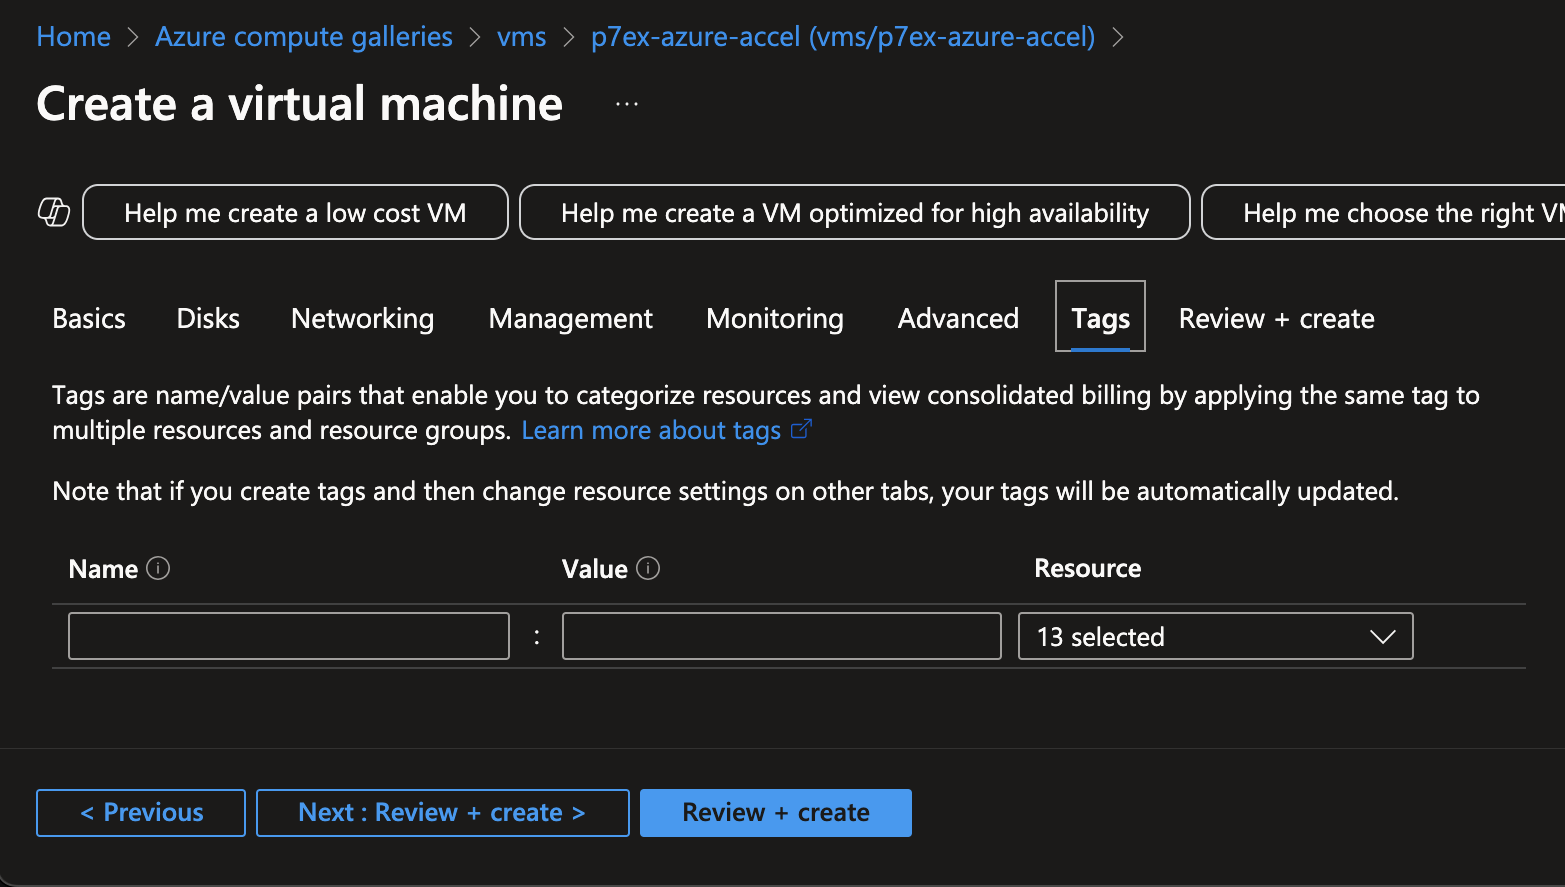
Azure - tag settings: accept defaults -
Confirm your VM settings in the Review + create tab and click Create.
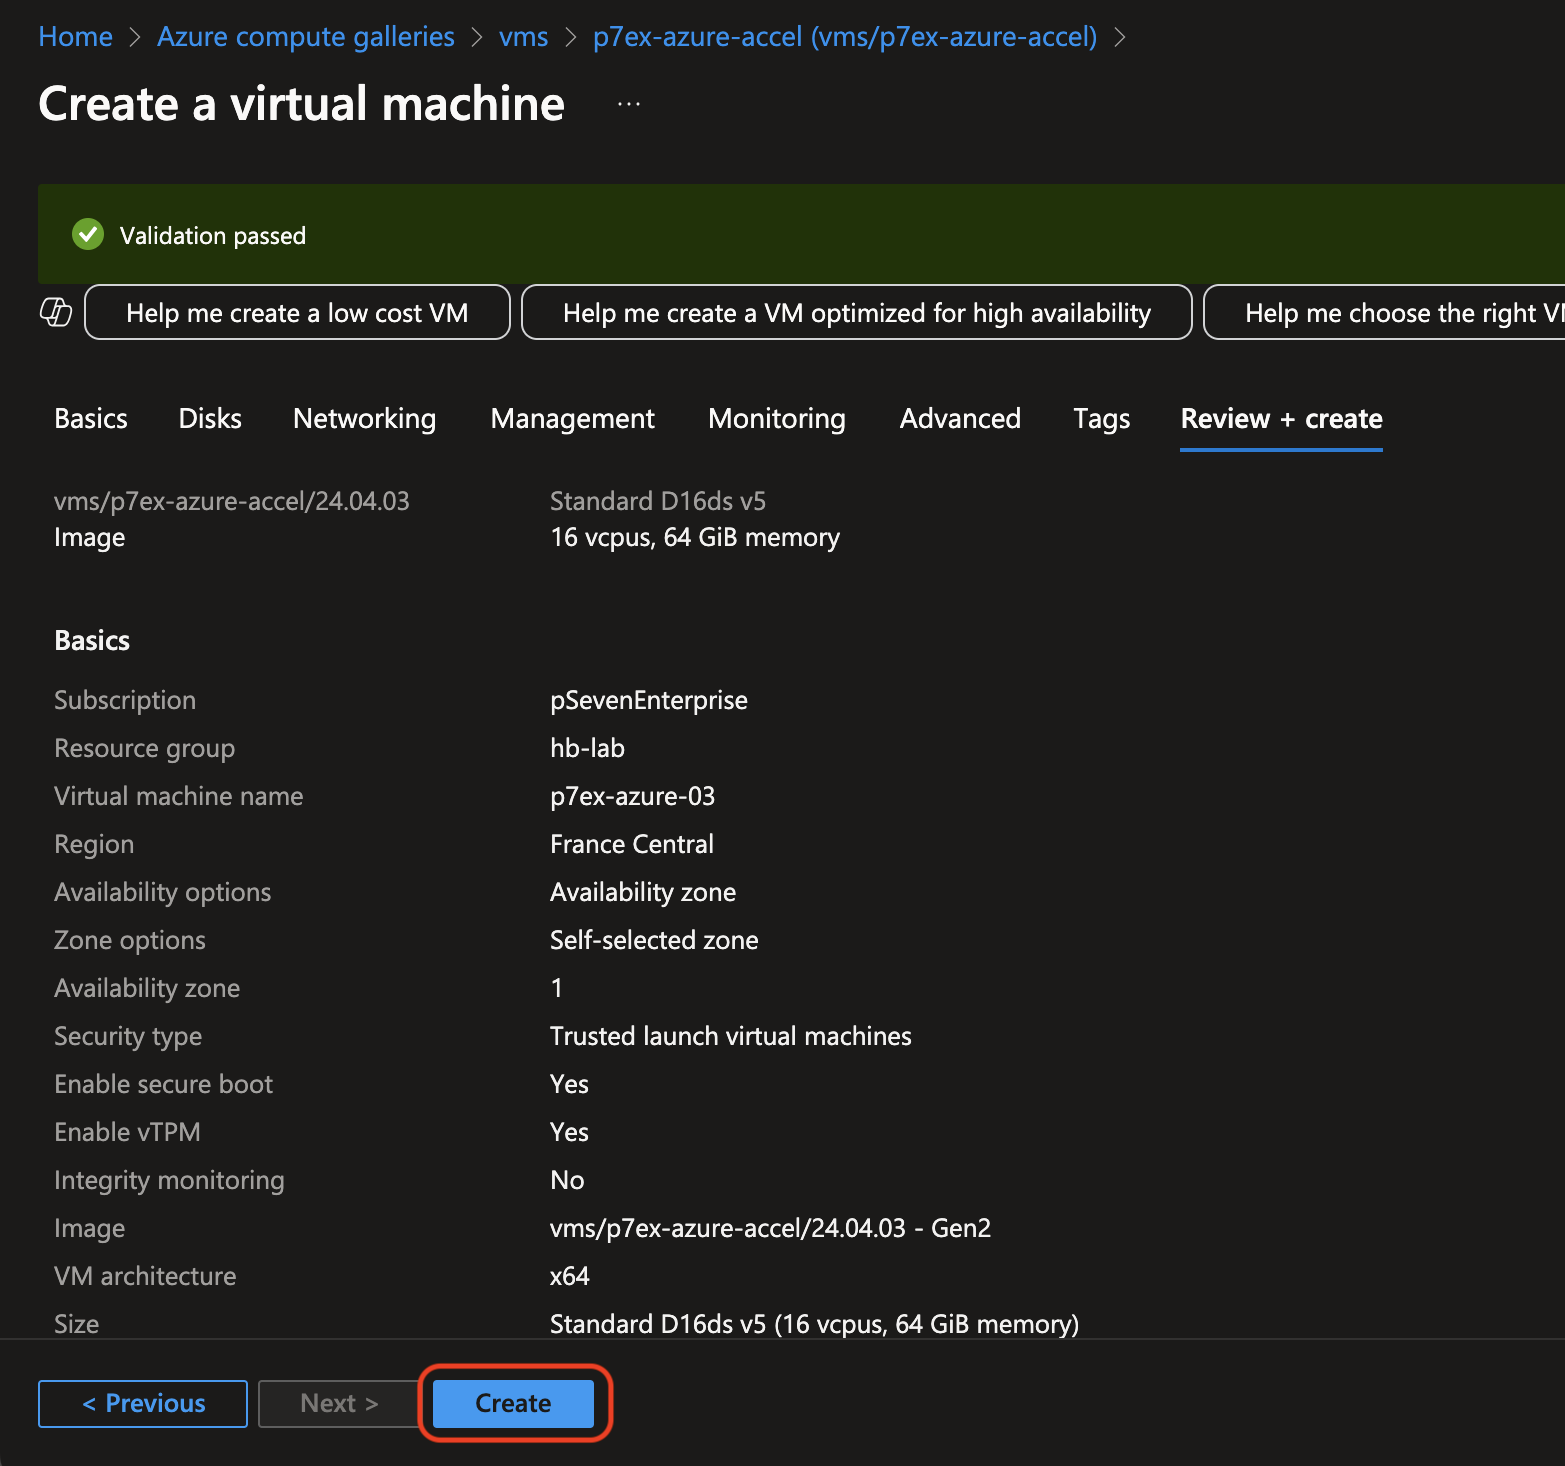
Azure - VM settings review -
Wait until the VM is ready. Confirm your setup, then continue with the deployment guide from step 2 onwards.
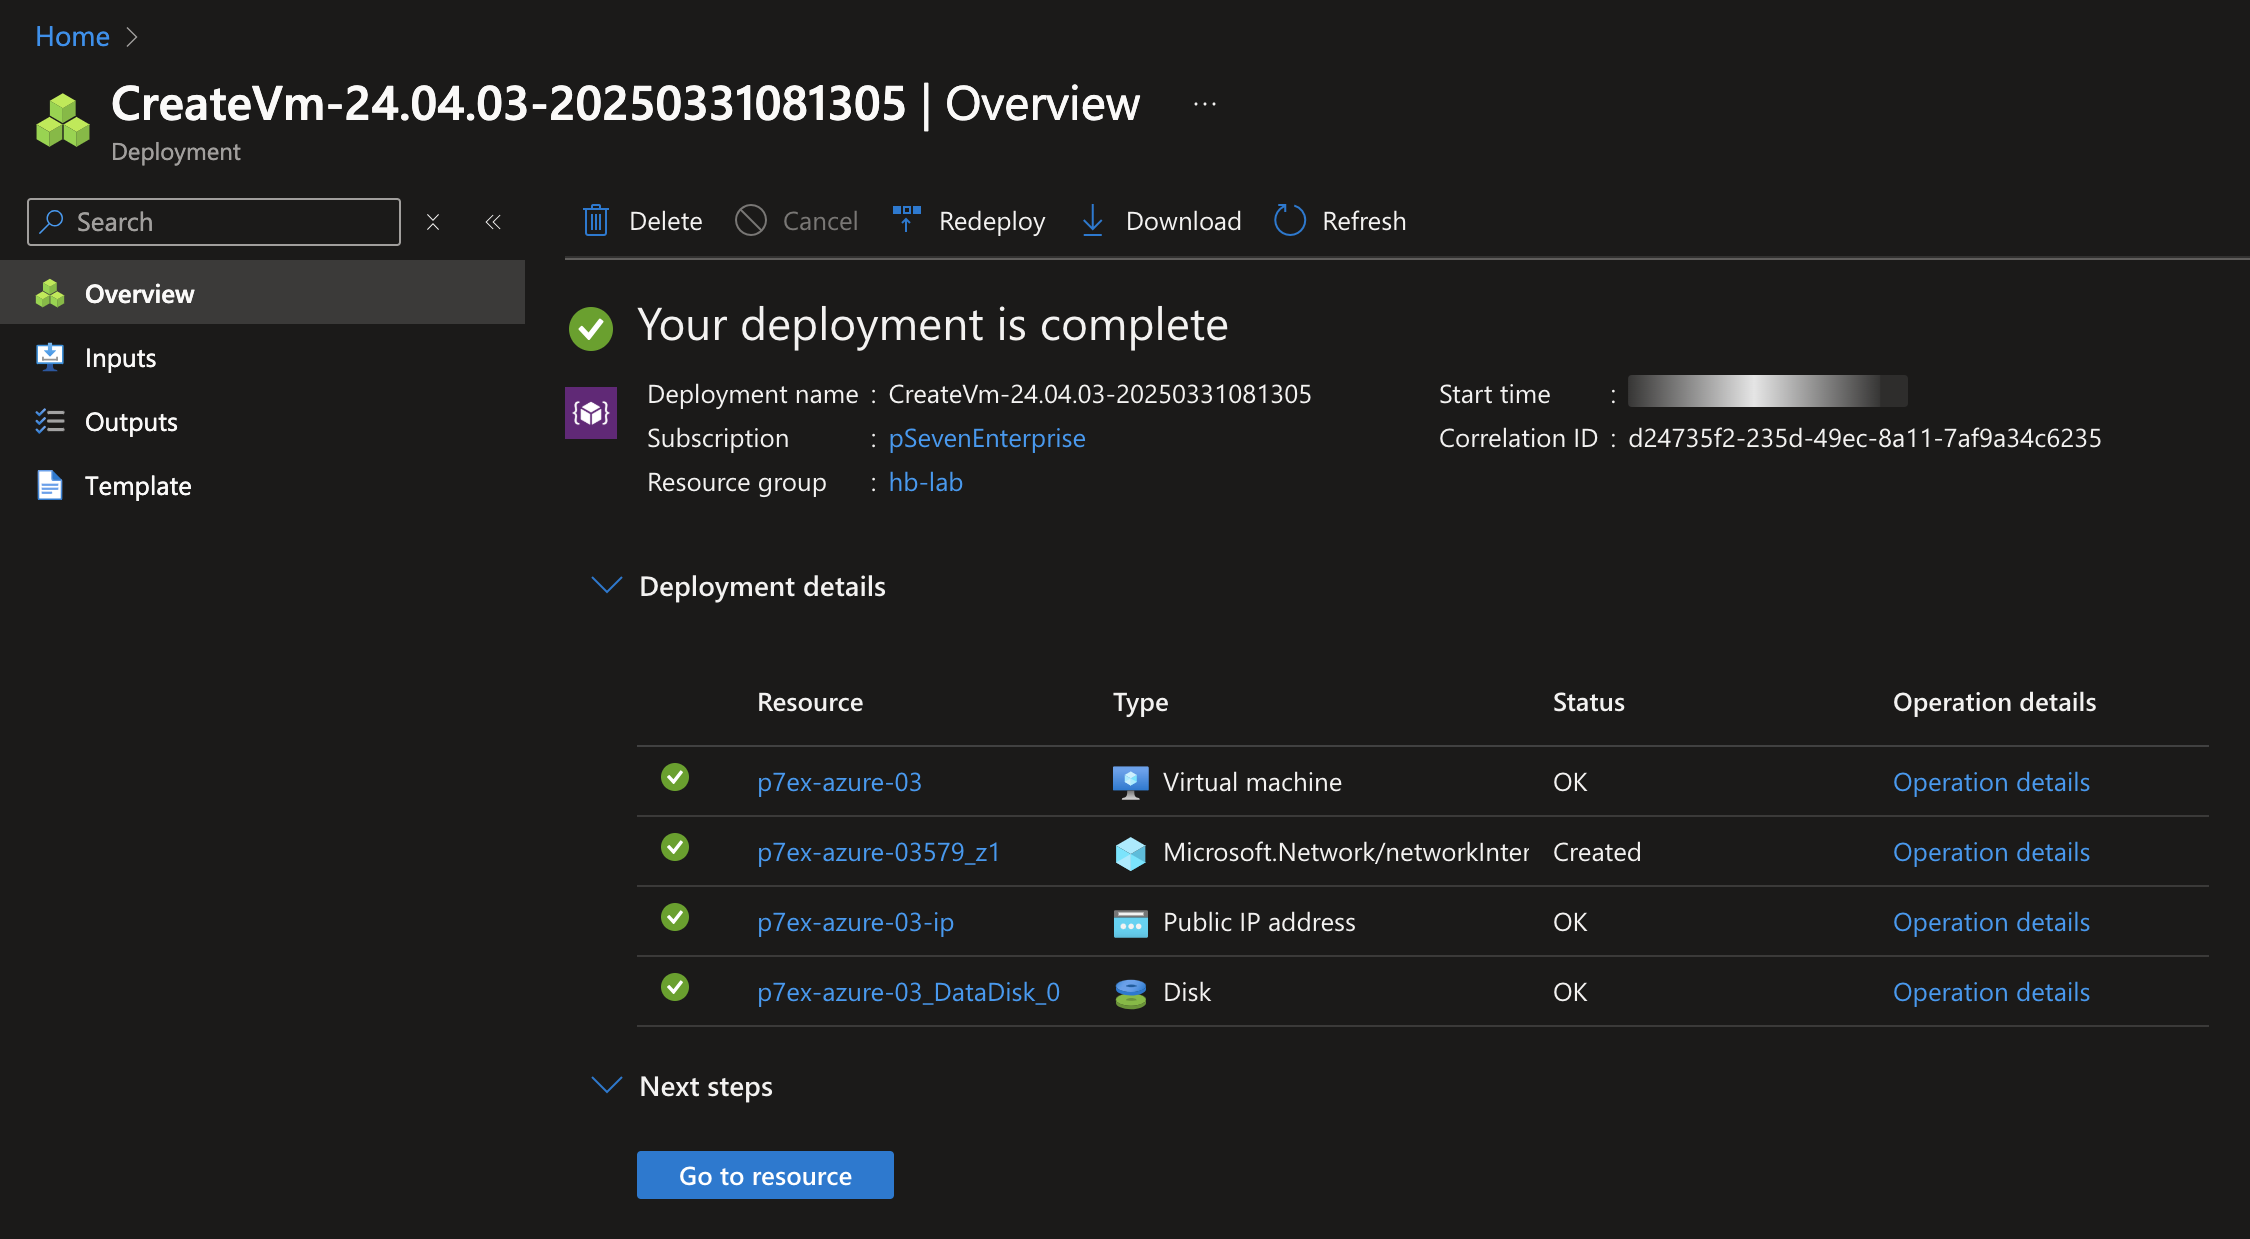
Azure - VM ready
Microsoft Hyper-V deployment
This section provides guidelines for pSeven Enterprise Express deployment in Microsoft Hyper-V. Set up a Hyper-V VM following these guidelines, then complete all steps in the Deployment section, starting with step 2.
The screenshots in this section show Hyper-V 10.0.19041.1 as an example. In your version, the settings UI might look differently. Required settings are the same, regardless of the Hyper-V version.
-
Create a new virtual switch dedicated for pSeven Enterprise Express. Select the switch type: "External".
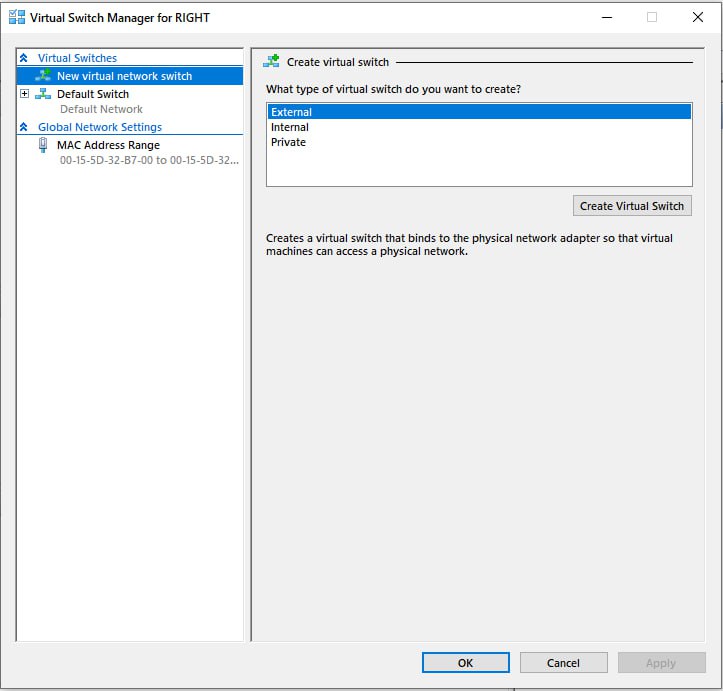
Hyper-V - add a new virtual switch with type: "External" -
Name the new switch as you choose and set up as shown.
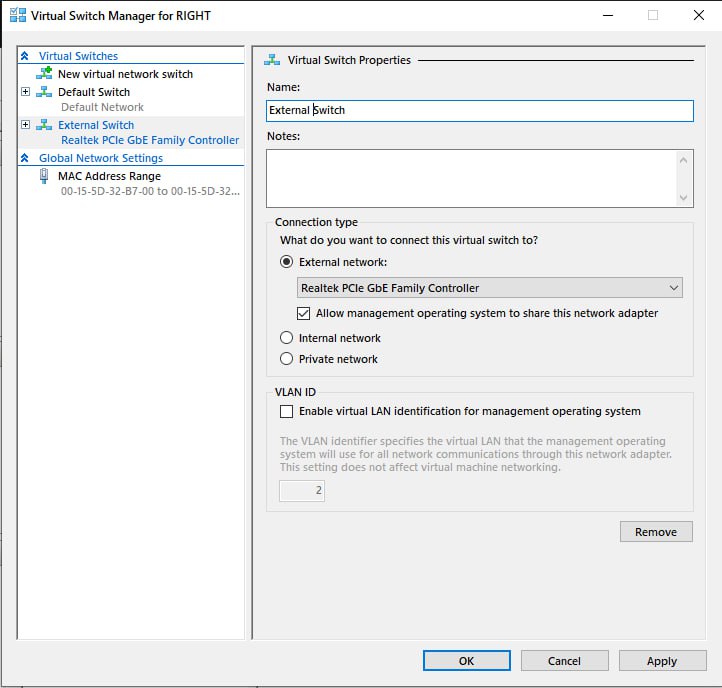
Hyper-V - virtual switch settings for pSeven Enterprise Express -
Add a new VM in Hyper-V. Name it as you choose.
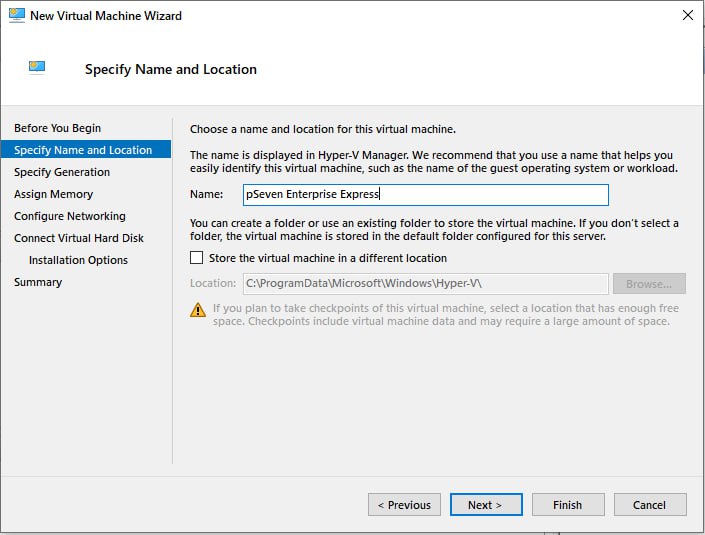
Hyper-V - create a new VM -
Specify generation 1 for this VM.
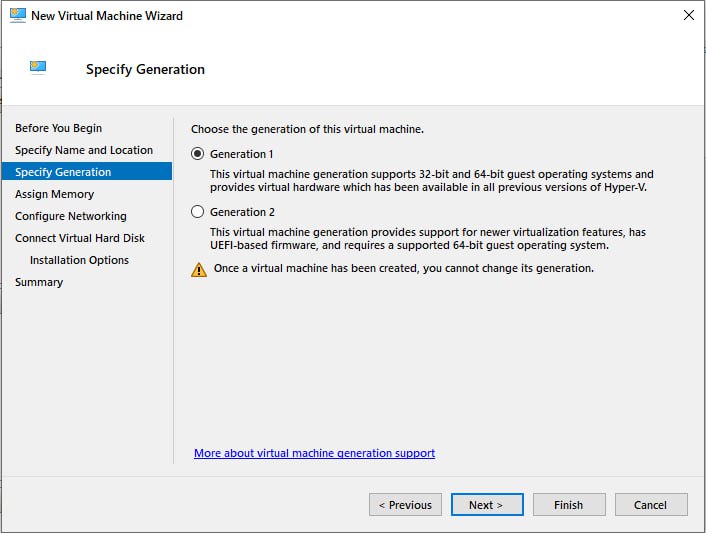
Hyper-V - specify VM generation 1 -
Assign memory to the VM. Note that 64 GB is the minimum required.
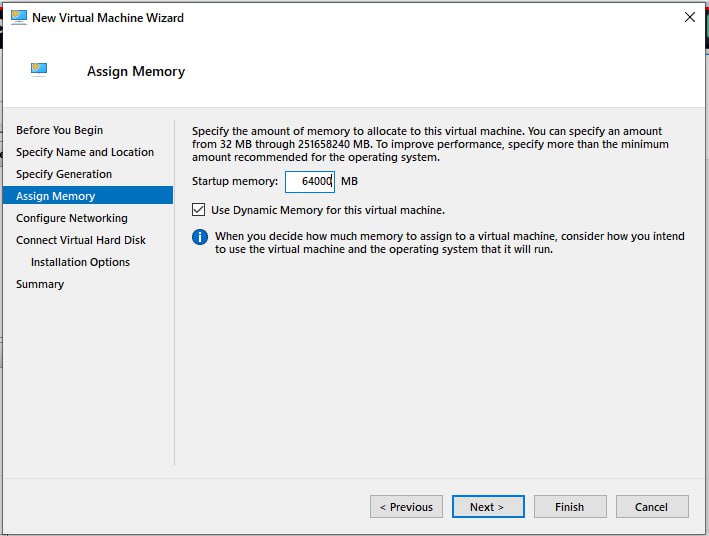
Hyper-V - assign 64 GB or more memory to the VM -
Configure the VM to use the virtual switch that you've previously created for pSeven Enterprise Express.
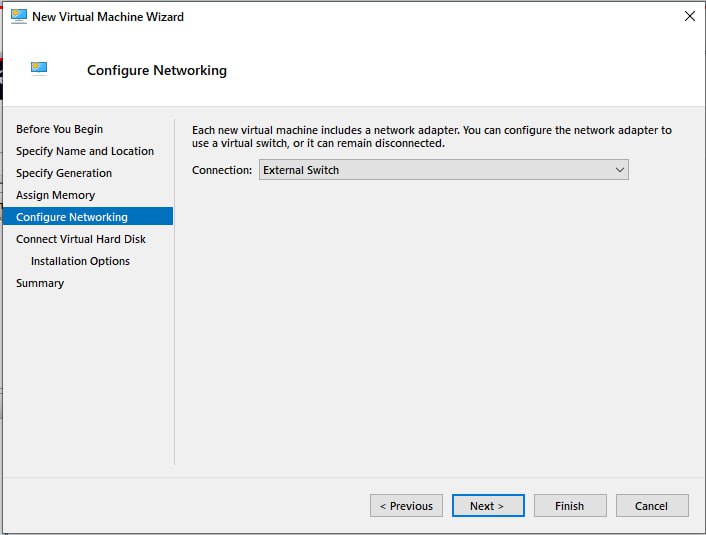
Hyper-V - select the virtual switch you've dedicated for pSeven Enterprise Express -
Add the existing boot disk from your pSeven Enterprise Express package (the VHDX image).
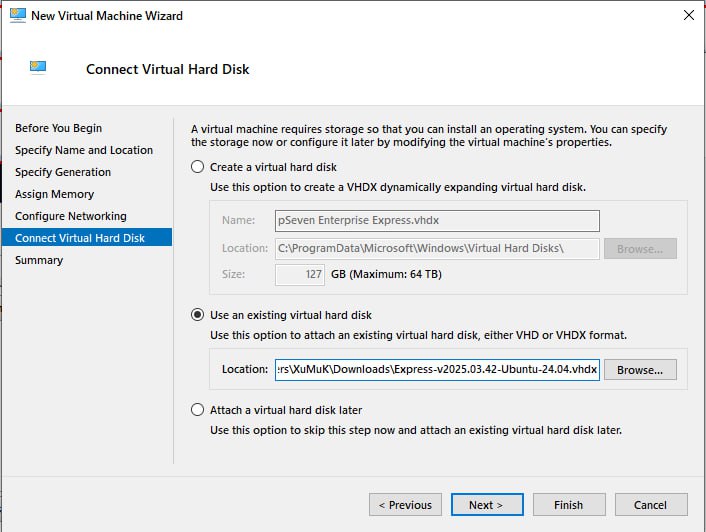
Hyper-V - add the VM boot disk: attach the pSeven Enterprise Express VHDX disk image -
Check the VM summary and confirm your setup.
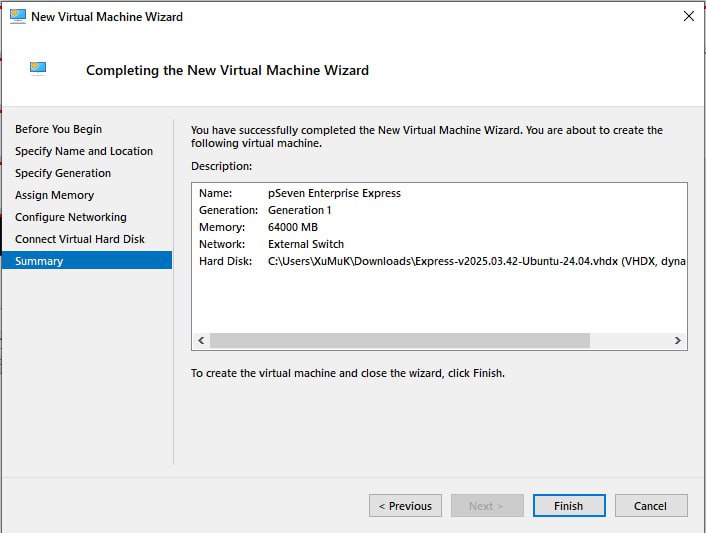
Hyper-V - confirm your VM setup -
Once the VM is created, add the data storage disk to it. Create a new empty disk ≥400 GB and attach it to a SCSI controller.
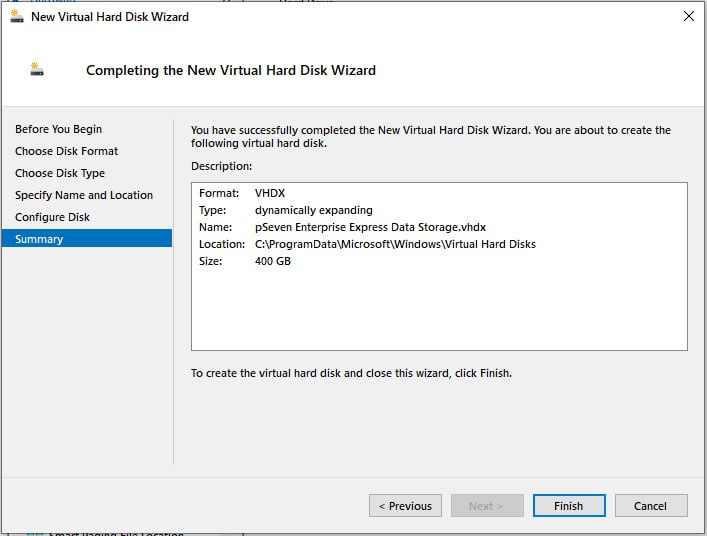
Hyper-V - create a new disk for data storage, 400 GB or greater 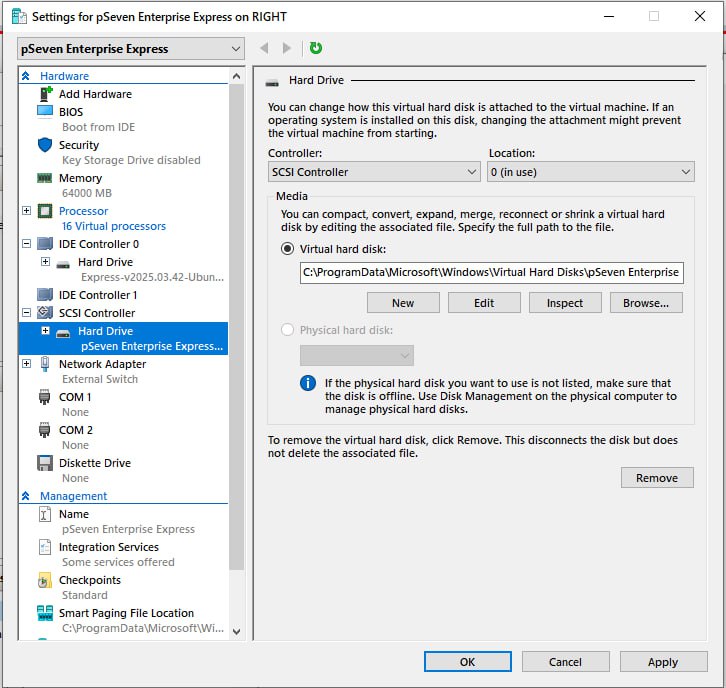
Hyper-V - attach the data storage disk to a SCSI controller -
Confirm your VM setup, then continue with the deployment guide from step 2 onwards.
VMware ESXi deployment
This section provides guidelines for pSeven Enterprise Express deployment in VMware ESXi. Set up an ESXi VM following these guidelines, then complete all steps in the Deployment section, starting with step 2.
The screenshots in this section show VMware ESXi 6.7.0 as an example. In your version, the settings UI might look differently. Required settings are the same, regardless of the ESXi version.
-
Start with adding a new VM.
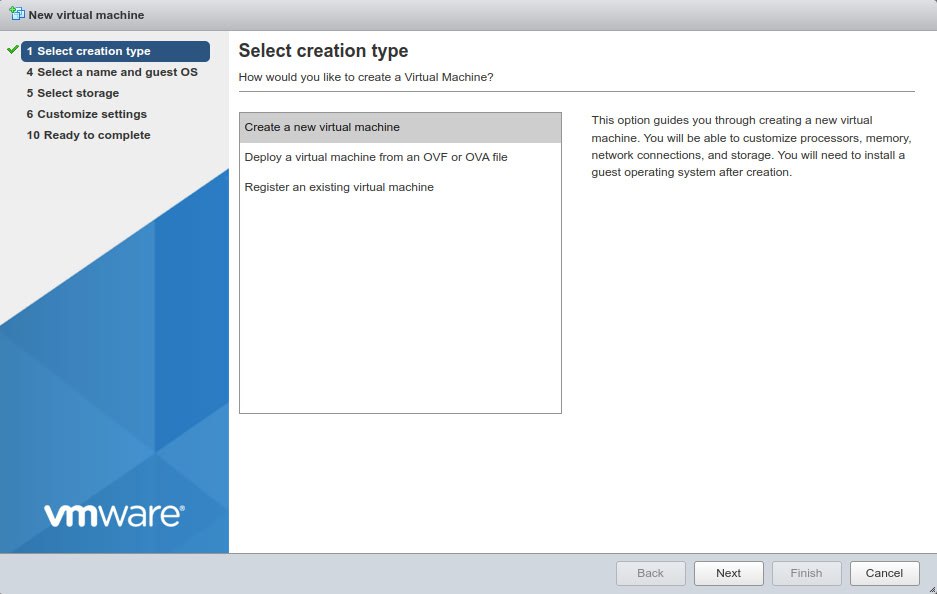
VMware ESXi - create a new VM -
Name the VM as you choose. In the guest OS settings, select generic 64-bit Linux.

VMware ESXi - name the VM and set the guest OS to generic 64-bit Linux -
Select the datastore where the pSeven Enterprise Express boot disk image is located.
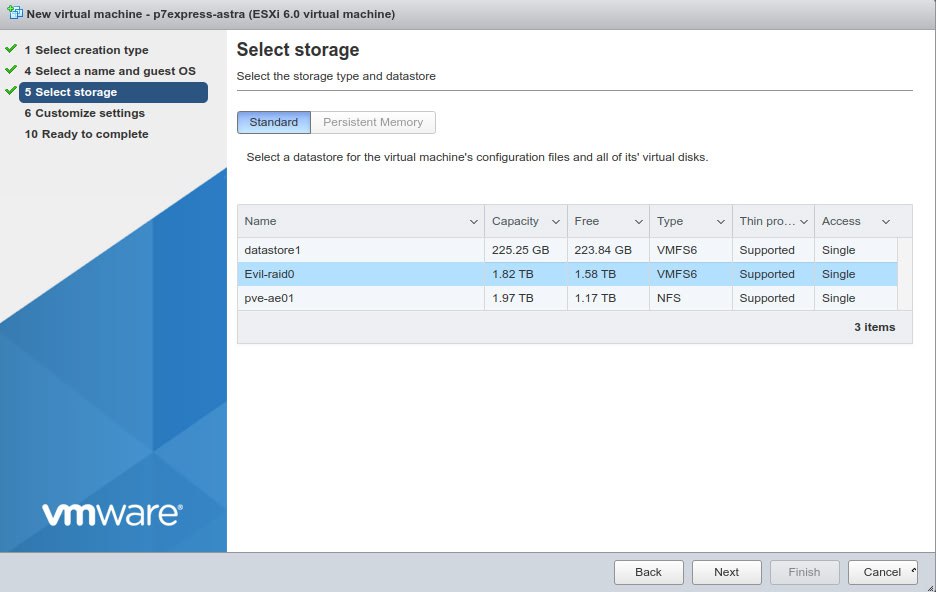
VMware ESXi - select the datastore with the pSeven Enterprise Express VMDK image -
Configure the VM hardware. Note that the minimum settings are 16 CPU and 64 GB memory.
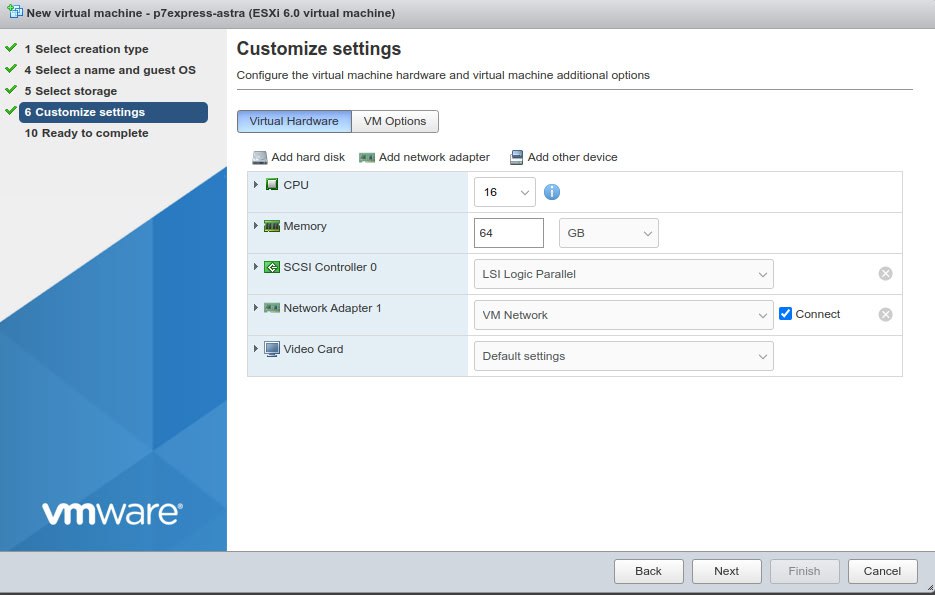
VMware ESXi - set the VM resources: 16 CPU, 64 GB memory minimum -
Add the existing boot disk from your pSeven Enterprise Express package (the VMDK image).
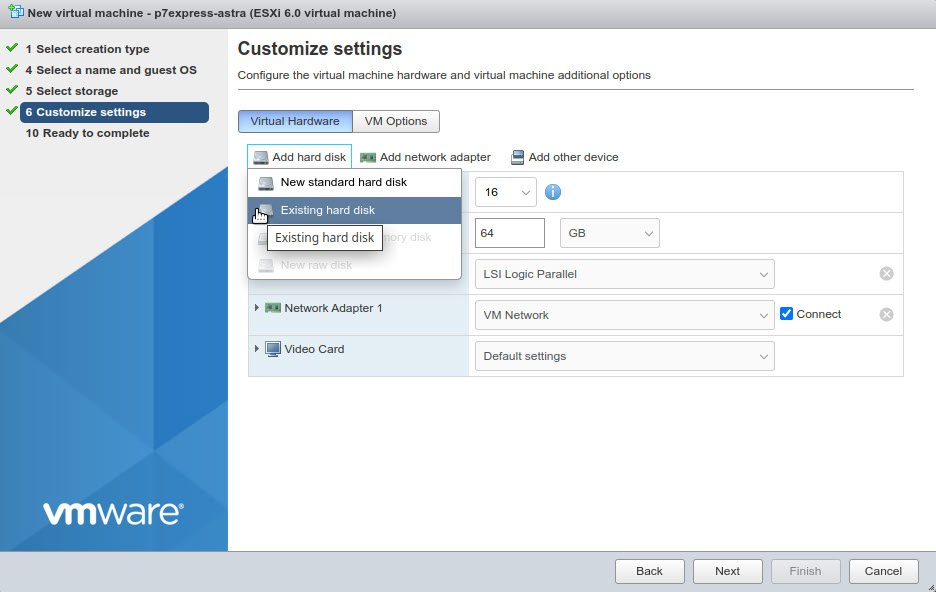
VMware ESXi - add the VM boot disk: select existing 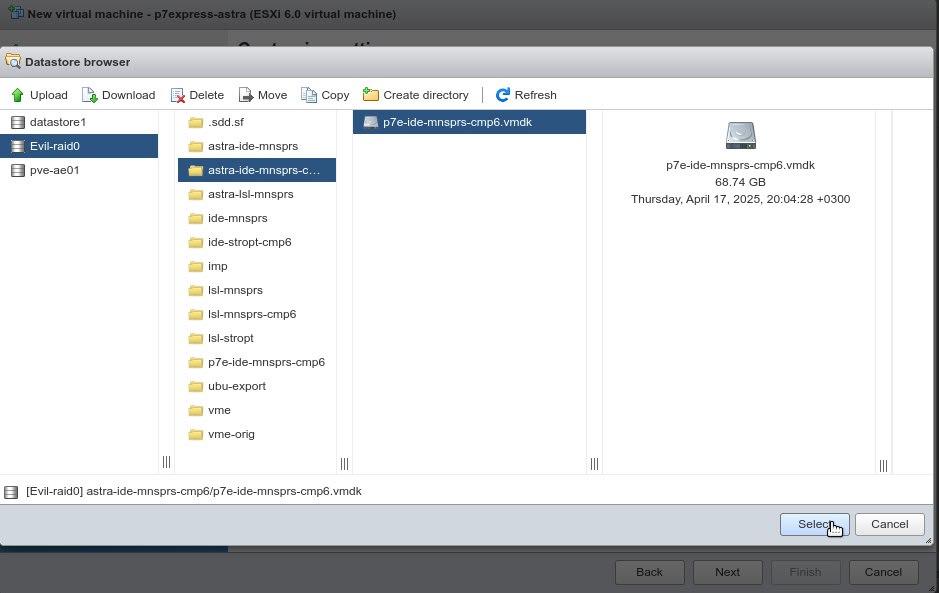
VMware ESXi - select the pSeven Enterprise Express VMDK disk image -
The boot disk must be attached to an IDE controller. Expand the disk settings and set the controller location to "IDE controller 0".
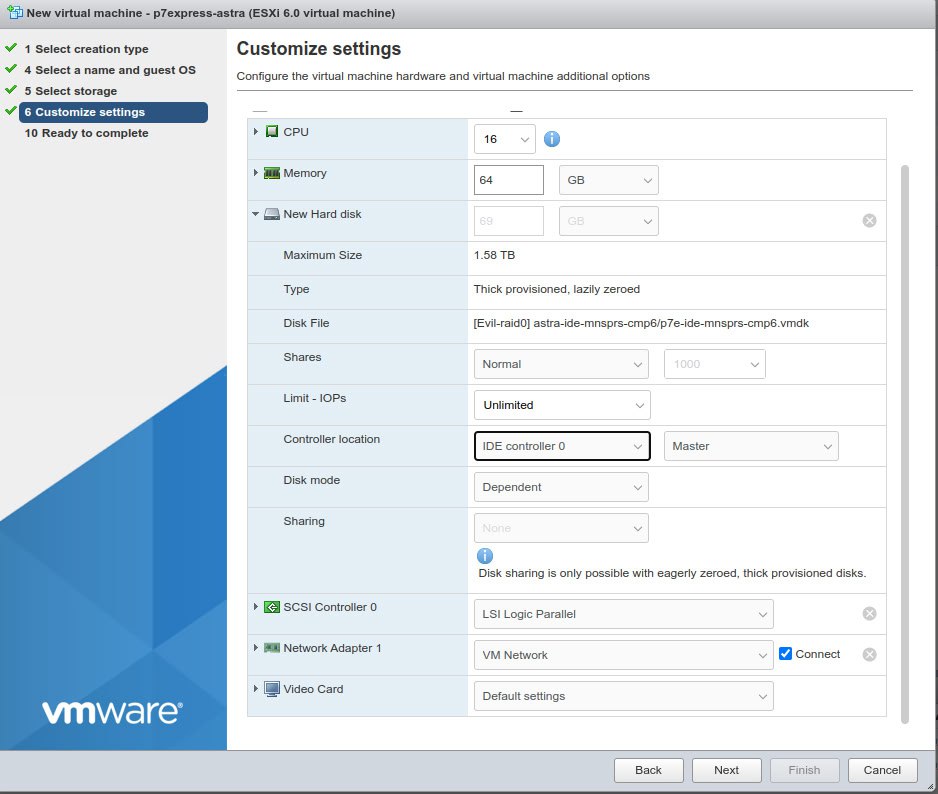
VMware ESXi - the VM boot disk must use an IDE controller -
Add a new standard disk for the pSeven Enterprise data storage.
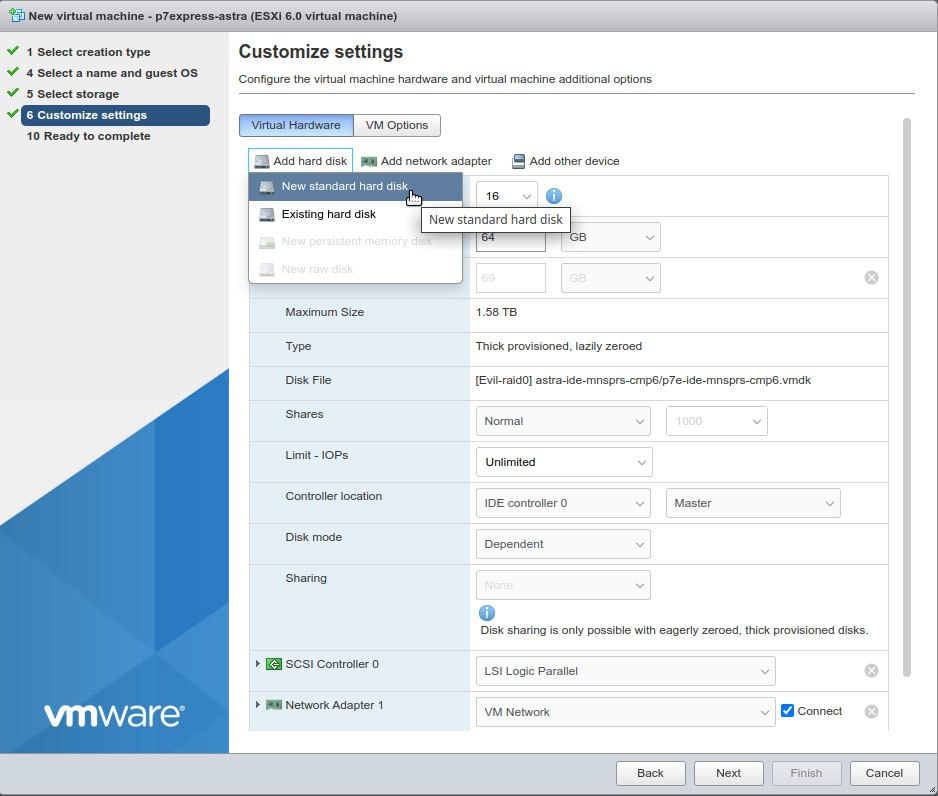
VMware ESXi - add a new disk for data storage -
Set up the data storage disk as shown. The minimum size is 400 GB.

VMware ESXi - set up the storage disk with 400 GB at least -
Confirm your VM setup and click Finish, then continue with the deployment guide from step 2 onwards.

VMware ESXi - final VM summary